Mac DVD burn FAQ: How do I burn a CD or DVD on a Mac? (iMac, MacBook, Mac Pro, etc.)
It's funny, I've had a MacBook Pro for well over a year now, but haven't burned a CD or DVD until today. I actually didn't know how to do it, so I just inserted a blank DVD-R into the drive and then figured out what to do. Here's a quick summary of the "Mac CD/DVD burn" steps I followed.
2023 UPDATE: I originally wrote this tutorial for Mac OS X systems many moons ago, but I just followed this process again in June, 2023, to burn some free podcasts to CDs — because those are much easier to use in a car when you’re driving alone — and although there are some changes to the macOS UI, these steps still work.
Mac CD/DVD burning - How to burn a CD or DVD on macOS
To get started with the Mac DVD burning process, insert a blank DVD-R. (Or, insert a blank CD if that's all you have, or all you can use on your Mac system.)
After a few moments your system will display a Mac CD/DVD burn dialog to help you get started:
![]()
On this Mac DVD burn dialog, I chose the default "Open Finder" option. This creates a Mac burn folder on your desktop named "Untitled DVD", or if you have your system set up to show the complete filename you'll see "Untitled DVD.fpbf".
Mac CD/DVD burning - the macOS burn folder
Next, double-click this Mac burn folder to open it, and you'll see that it looks like a regular, empty Mac folder, with a "Recordable DVD" label on the top, and a "Burn" button in the upper-right corner. As mentioned, this is a special Mac folder named a "Mac burn folder".
But don't worry about that -- just treat it as a normal Mac folder, and drag the contents to it that you want burned to the DVD. It should like something like the next figure:
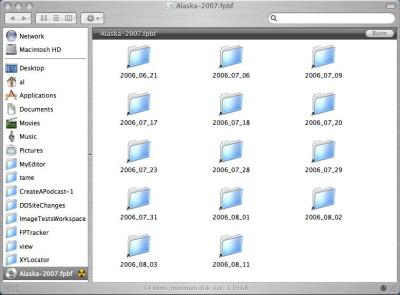
Once you have everything in the Mac burn folder you want to copy, press the Burn button to burn your Mac data to the DVD. Your Mac will then display the next dialog:
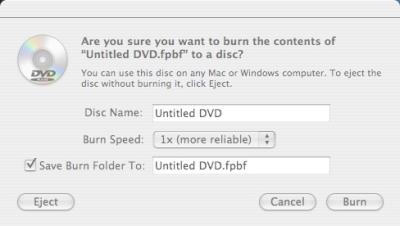
On this Mac DVD burn dialog enter the name you want to call the DVD (this is the name people will see when the DVD is inserted into their system, in my case, something like "Alaska 2007 Pictures"), a Burn Speed ("1x" being slower but more reliable), and, optionally, you can save the burn folder to a name you specify. This is optional, but I did it so I could easily burn the same content to several different DVDs.
After filling in those prompts, press the "Burn" button on that dialog, and in a few moments you should see the next dialog, showing that your Mac has started to copy/burn your data to the DVD:

After the Mac DVD burn process is complete
When the Mac DVD burn process is finished, this small dialog goes away, and you'll be left looking at your Mac burn folder. If you don't want to burn another DVD just eject the current disk, verify its contents on another system (I suppose this step is optional, but I don't think I'd skip it), then dispose of the burn folder if it's still on your desktop.
Otherwise, if you want to burn the same content to another disk, first eject the current disk; insert a new one; select the "Open Finder" dialog on the first dialog; then come back to your Mac burn folder and click the "Burn" button again. This may temporarily leave a new "Untitled DVD" folder on your desktop, but it's easy enough to clean that up when the burning is done. (Actually, I think it may go away when you eject the current DVD.)
That process worked for me. I think it can be simplified with a multi-step wizard, but the steps were fairly obvious. I mostly just took a few wrong turns when burning the same content to multiple DVDs.
Related - Using Mac burn folders to make a backup
On a related note, I've also written a longer and more thorough article titled "How to use Mac burn folders to make a backup on macOS".
I hope this "Mac DVD burn" tutorial has been helpful. As usual, feel free to leave any questions or comments in the Comments section below.
books by alvin
 |
 |
 |
 |