| Developer's Daily | Visual Cafe Education |
| front page | java | perl | unix | DevDirectory |
When developing Java applications, developers sometimes run into problems with the usability of the interface. For example, if you're creating an order-entry application, at some point youll want to prompt the user to enter a name, address, telephone number, and other information into text fields. Setting up these basic text fields is very easy with Visual Café, and the resulting interface looks clean. The problem with the interface arises from the users perspective: It isnt always easy to use.
When you think about the data-entry process from the standpoint of the end-user, its handy to be able to use the [Tab] key to move between fields while entering data. As a user, you simply start entering data in the first field, press the [Tab] key to move to the next field, enter more data, tab to the next field, and so on. People entering data generally find it easiest to keep their hands on the keyboard during the entire data-entry process.
The users other option is to use the mouse to move between data-entry fields. However, this process is inefficient and cumbersome - I know some users who think its very annoying. Lets face it: The [Tab] capability is expected by end users, and as developers we should support it.
By default, the Java AWT doesnt let you configure the interface to
support tabbing between data-entry fields. However, in Visual Café,
Symantec has created a custom panel that lets you configure your applications
to use the [Tab] key for this purpose. The KeyPressManagerPanel
extends the standard Java AWT Panel component. In this article, well show
you how to use this panel to improve the usability of the user interface
in your applications.
Creating a couple of test applets
The best way to demonstrate the functionality of the KeyPressManagerPanel is to create two simple data-entry applets. Youll create the first applet without using the KeyPressManagerPanel, so you can see the default Java behavior. The second time through, youll use the KeyPressManagerPanel so you can see how the interfaces behavior changes.
To create the first applet, open Visual Café, then select File | New Project. From the New Project menu, select Basic Applet, then click OK. Doing so will put you in the Visual Café development environment with everything you need to create a basic applet.
To simulate the data-entry fields of an order-entry application, drag
three TextField components from the Standard component palette onto
the Applet1 Form Designer window. As you do this, place the first
TextField component near the top of the applet window, place the second
TextField just below the first field, and place the third TextField below
the second field. Your Form Designer window should now look like the window
shown in Figure 1. These three fields will simulate the fields youd
use to prompt a user to enter a name, address, and telephone number.
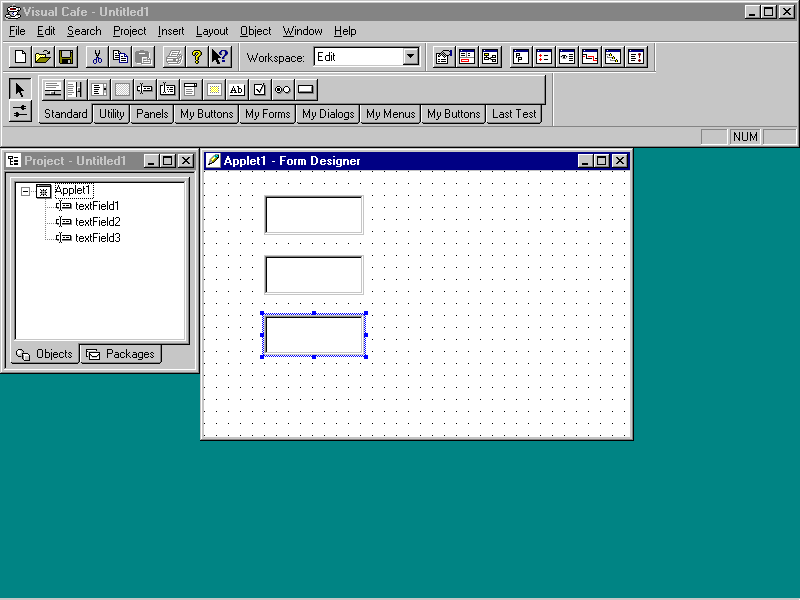
| Figure 1: | The Form Designer window for our first applet. |
Now, run the applet by selecting Project | Execute from Visual Cafés main menu. With the applet running, position the cursor in the first text field. Type your first name in this field, then press the [Tab] key to try to move to the second field - and notice that the cursor doesnt move. This is the default behavior. But even though its the default, its not what you want - it makes your applet programming skills look bad!
Now that youve seen the default behavior, lets create a nearly identical
applet that lets the user press the [Tab] key to move between fields. First,
discard the current applet by selecting File | Close Project. Then,
select File | New Project and choose Basic Applet from the New Project
window. Once again, youre placed in the Visual Café development
environment.
This time, before placing the three TextField components, youll place
a KeyPressManagerPanel container onto the Form Designer window. Youll
find the KeyPressManagerPanel in the Panels component panel, as shown in
Figure 2; its exact location depends on your version of Visual Café
and whether youve customized this panel.
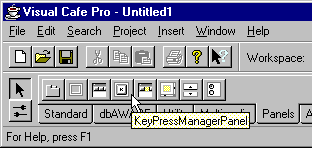
| Figure 2: | Youll find the KeyPressManagerPanel component in the Panels component panel. |
Once youve located the KeyPressManagerPanel component, left-click once on it. Doing so will change the shape of your mouse pointer to a cross-hair shape. Next, move the mouse pointer to the upper-left corner of the Form Designer screen. Click and drag the pointer to the lower-right corner of the screen, covering most of the screen. The goal is to cover most of the Form Designer screen with the KeyPressManagerPanel component, which will serve as a panel, or container, to hold your three TextField components.
Next, add three TextField components onto this container, just as you did in the first exercise. When you finish, the Form Designer window should look just like the one in the first applet, with the addition of the KeyPressManagerPanel under your text fields.
To test the applet, select Project | Execute. When the applet
begins running, use the mouse pointer to position the cursor in the first
field. Enter your name in this first field, and then press the [Tab] key
- the cursor should move into the second field. Press [Tab] key again,
and the cursor will move into the third field. Press [Tab] one more time
to move the cursor back to the first field. Congratulations: Youve created
a friendlier user interface!
A quick look at the source
In the snippet of Java source code shown in Listing 1, you can
see how the three TextField components are added to the KeyPressManagerPanel.
While the geometry of your applet will vary from the values shown in Listing
1, you should see that the text fields are added in order, from TextField1
through TextField3.
| ...
setLayout(null); addNotify(); resize(426,266); keyPressManagerPanel1 = new symantec.itools.awt.KeyPressManagerPanel(); keyPressManagerPanel1.setLayout(null); keyPressManagerPanel1.reshape(12,0,416,259); add(keyPressManagerPanel1); textField1 = new java.awt.TextField(); textField1.reshape(36,12,100,40); keyPressManagerPanel1.add(textField1); textField2 = new java.awt.TextField(); textField2.reshape(36,72,100,40); keyPressManagerPanel1.add(textField2); textField3 = new java.awt.TextField(); textField3.reshape(36,132,100,40); keyPressManagerPanel1.add(textField3); //}} |
| Listing 1: | Snippet of Java source code from the init() method of Applet1.java. |
The order in which the tab key moves through your data entry fields - in our case from TextField1 to TextField2 to TextField3 - is called the tab order. The tab order is initially controlled by the order in which you add your components to the KeyPressManagerPanel. In our example, because we added the text fields in top-down order, the [Tab] key moves the cursor from the top TextField to the middle to the bottom, then from the bottom back to the top.
This example was fairly easy, but in the more complex real world of software development, you wont always be able to add components to the KeyPressManagerPanel in the tab order you want. For example, you may create a first draft of an interface design, then review the design with your end users. After the review, a few changes to the interface may be required - and the next thing you know, your tab order is completely out of whack! Fortunately, Visual Café lets you easily modify the tab order of your components by manipulating the order in which theyre listed in the Project window.
If you added the components as described so far, your Project window
will look like the one shown in Figure 3. Notice that the TextField
components are listed in order, from top to bottom. Also notice that the
TextField components are contained within the KeyPressManagerPanel.
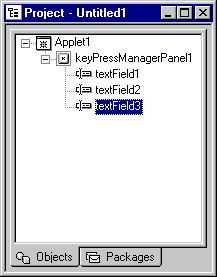
| Figure 3: | The Project window shows the tab order of the TextField components in the KeyPressManagerPanel. |
As a simple demonstration of modifying the tab order of these components,
click and drag TextField3 to a point just above TextField2 (but below TextField1).
Thats all you have to do to change the tab order of the components. Test
your change by selecting Project | Execute, then using the [Tab]
key to move between the TextField components. Youll see that the cursor
will move from TextField1 to TextField3, from TextField3
to TextField2, and finally from TextField2 back to TextField1.
Conclusion
As you can see, its very easy to use the KeyPressManagerPanel container in your applications. I highly recommend using this container to make your applets and applications easier to use. The only drawback is that the container requires you to use the custom tools that come from Symantec. However, Ive found that its pretty easy to put the Symantec class library onto my Internet site, then use these tools to improve the applets and applications I develop.
Note - this article first appeared in ZD Journals, by Ziff-Davis.
Copyright © 1998 DevDaily Interactive, Inc.
All Rights Reserved.
