| Developer's Daily | Visual Cafe Education |
| front page | java | perl | unix | DevDirectory |
Introduction
True story: A few years ago I took a hiatus from the computing world for a few months, and traveled a little bit, mostly visiting friends and relatives. One night at dinner I was asked - since I wasn't doing anything else - if I could write a software program to help win the lottery.
Now what does this have to do with the need to control Symantec's TabPanel
component? A little while ago this program became an applet, and
the TabPanel became our primary interface component. After a little
prototyping, we realized that a little behind-the-scenes programming would
help achieve our goals.
Breaking the bank
I'll skip the applet details, other than to say that it uses some game and number theories. In short, it uses a four-step process to generate the desired results, and a fifth step to look at the output.
While prototyping the applet we decided that a TabPanel component with five tab groups labeled "Step 1" through "Step 5" would be a unique user interface for this process. (We also examined a CardLayout "Wizard" approach, but decided it would be too cumbersome for expert users who wanted to maneuver quickly.)
In the fourth step of the applet process the user enters some final data, and then clicks a button labeled Run Calculations. When this Run button is clicked, the applet runs the calculations, displays some progress information, and then switches the active tab group to the Step 5 group when the calculations are finished.
In the remainder of this article, we'll look at the steps necessary
to tell the Run button to automatically switch to the fifth tab group active
after the calculations are completed. We'll also show a little supplementary
code for programming Next and Previous buttons that give
the user another way to move through tab groups.
Creating the applet
The first part of our applet is created in our first article on creating a TabPanel component in less-than five minutes. Once you've finished those prerequisite steps, you can continue with the following steps.
After creating the Run button in the tab group labeled Step 4, you need to create an interaction between that Run button and the TabPanel component. You can either write the code manually to generate that interaction, or use Symantec's Interaction Wizard.
Before starting the Interaction Wizard, make sure the Run button in the Step 4 tab group in the Form Designer window is visible. Then, left-click the Interaction Wizard icon. This changes the shape of your cursor. Next, left-click on the Run button, and then drag your cursor to one of the tab labels in the TabPanel component, and then release the mouse button. Notice that the boundaries of the various on-screen components are displayed for you as you move the mouse, so targeting the TabPanel component is made easier. (If you'd like, you can also find it generate this interaction by pointing at the button1 and tabPanel1 objects in the Project window.)
This activity brings up Visual Cafe's Interaction Wizard. This wizard really makes this potentially difficult programming job very easy. The first step in the wizard process is labeled Start an interaction for "button1" .... Here you can select either Action or MouseClick. Either one will work fine in this case, so I scrolled down and selected MouseClick.
The second choice is labeled Select the item you want to interact with.... Here, the tabPanel1 component should be selected already. If it's not, scroll through the possible options of components and select it as the component we want to interact with.
The final choice on this wizard screen is labeled Choose what you want to happen.... Scroll down through this list until you find the option named Set the Current Tab Index.... Select this option, and then click the Next button to bring up the second screen of the wizard.
The second screen prompts you to determine how the wizard should set the new tab index. In our case, because we want to make the fifth tab group the active group, we only have to enter a numeric constant (4) under the second radio button, labeled An integer constant or expression. Click this radio button, and then enter the number four in this field. (Tab group numbering starts at zero, so the fifth tab group is referred to by index number four.)
That's all you have to do to configure the interaction telling the Run
button to switch to the fifth tab group. To verify that it works
properly, compile and run the applet by selecting Project | Execute.
Discussion
In the case of our actual LottoBuster applet, we need to run our analytical
calculations before switching to the fifth tab group. Therefore,
we dug into the code and added a runCalculations() method before
switching to the fifth tab group. This change is shown in Listing
1.
|
void button1_MouseClick(java.awt.event.MouseEvent event)
//{{CONNECTION
{
|
| Listing 1: | The actual applet code calls the runCalculations() method in button1_MouseClick() before attempting to set the current panel index. |
Another approach
Before settling on this design, we used another design with two buttons
labeled Next Step and Previous Step. As shown in Figure
1, these buttons sat below the TabPanel, and provided another way for
the users to move from one step to the next. In the end, we decided
against this approach and eliminated those buttons. However, the
code is not forgotten, and may be useful in other applications.
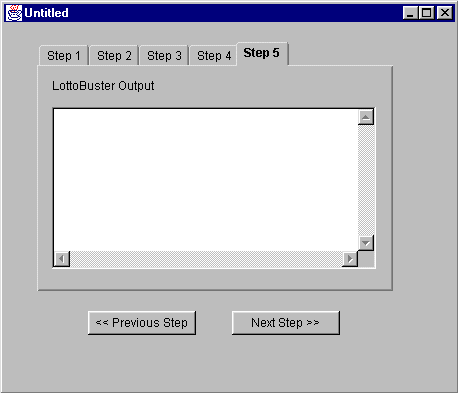
| Figure 1: | A first design approach used Next and Previous buttons to navigate through the five steps. |
When you're interested in an approach that programmatically changes
the active tab group, here's the code that was triggered when the user
clicked the Next Step button:
|
void nextStepButton_Action(java.awt.event.ActionEvent event)
int currentTabIndex =
}
|
| Listing 2:
|
The code for the Next Step button is more complex, and changes the index back to zero after the last tab group is reached. |
Conclusion
Symantec's Interaction Wizard makes a potentially difficult job of programming the interaction between the Run button and the active tab index very simple. In the cases where the Interaction Wizard doesn't provide all the strength you need, the additional code listing we've provided will get you pointed in the right direction.
(Final note: the last I heard there was a couple staying $52 ahead of
the lottery officials, although they hadn't broken through on the big one
yet. ;)
Copyright © 1998 DevDaily Interactive, Inc.
All Rights Reserved.
