It was driving me crazy that the quality of the songs I was streaming from a website known as Bandcamp sounded better than the quality of the songs I was playing from my iTunes collection. In my case, I recently bought a Marian Call CD named “Something Fierce”, and had imported the songs from that CD into iTunes. But the songs I streamed from Bandcamp sounded better than the songs I imported from the CD; how could this be?
I dug into the problem and found two simple fixes, both in iTunes. In this article I'll show you how to make those fixes to dramatically increase your iTunes sound/music quality.
Test: If you want to hear a high-quality song, go to this Bandcamp URL, and play Marian Call’s song titled “Temporal Dominoes”. It’s the sixth song on the list, it’s free, and it’s also a great song. Turn up the volume a little bit, listen to the quality of that song, then play one of your own songs in iTunes on the same computer, and see if there’s a difference.
Before I made the following changes, when I played that song from Bandcamp it sounded like she was in the room with me, but when I played it from iTunes it sounded like she was singing in the closet. If you notice a similar difference, this article might be able to improve your iTunes sound quality.
1) Fix your iTunes “Import CD” settings
The first thing I did was to dramatically increase the bit rate of the songs that I was importing into iTunes from CDs. I knew I had been using the default setting for MP3 files, which was 128 kbps. As a test, I jacked this up to the maximum -- 320 kbps -- and the difference was noticeable.
The following images show how to do this. First, switch to iTunes, then click “iTunes” in your Mac menu bar, then click “Preferences”. That brings up this dialog:
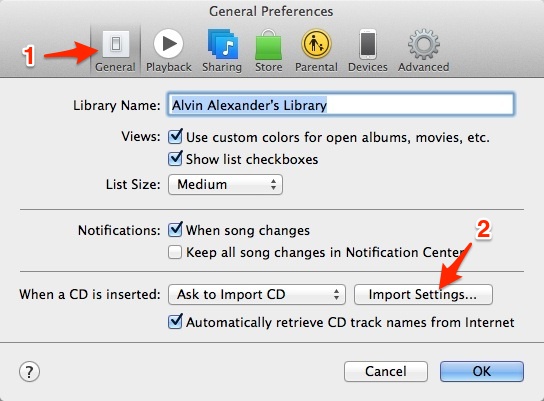
As the notes on that image show, first click the “General” button if it isn’t already selected, and then click the “Import Settings” button. That brings up the second dialog:
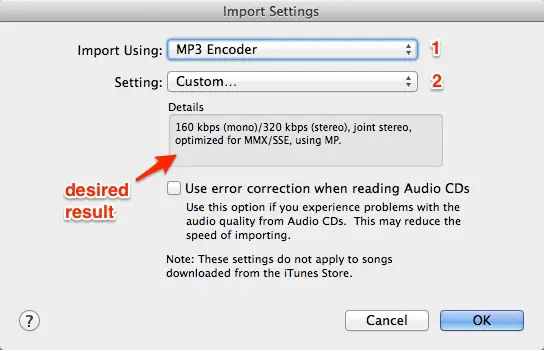
On this dialog, the first dropdown widget lets you choose the “type” of file you want to import. I always choose “MP3”, so I’ve done that here. The second dropdown is the one I needed to change. It was set to “128 kbps”, and as you can see, I increased that to “320 kbps”.
When you select “Custom” on that second dropdown widget you’ll be presented with this next dialog:
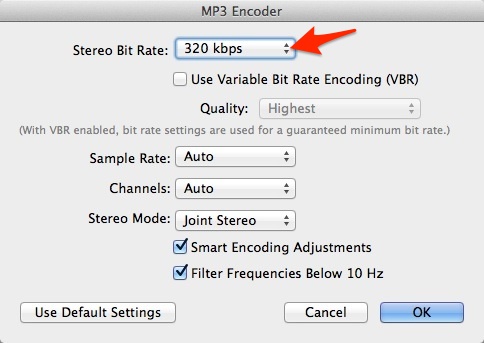
As the arrow on this image shows, I changed the bit rate quality to “320 kbps”, which is the highest quality supported by iTunes for MP3 files. (After reading other articles on the internet, I think this is the highest quality supported, period.)
After making these changes, I clicked “OK” on all of the preferences dialogs to close them.
Note 1: I suspect that this configuration will significantly increase the size of the song files that are saved to your hard drive. This setting increases the quality by a factor of 2.5, and I suspect that the files on your hard drive will also be increased by a size of 2.5. I don’t think thhis is a big deal on your hard drive, but when you transfer the songs to your phone or tablet, the increased size may be an issue there. (I haven’t looked yet to see how to control the size/quality of songs that are transferred to iPhones and iPads yet.)
Note 2: You might be able to get a better quality and/or smaller music files by choosing a format other than “MP3”. I’m definitely not an expert in this area, but I’ll see what else I can learn. (It’s always been important to me to be able to copy my music to whatever devices I own, so I’ve always used MP3s, and never thought about the other formats.)
2) Re-import your songs
The next thing I did was to delete the songs in iTunes so I could re-import them.
In my case I deleted the songs in my iTunes collection from Marian Call’s “Something Fierce” album, and then imported them again from the original CDs. With the settings I changed in Step 1, these songs are now in iTunes in the highest quality.
Note: I haven’t tried this yet, but you may not have to delete your songs in iTunes. I suspect that it’s possible to just overwite them when you re-import them at the higher quality. I’ll update this article after I test that.
3) Fix your iTunes playback settings
After re-importing her CD, I immediately played her song titled “Temporal Dominoes”, because at the beginning of that song I could hear a dramatic difference between the iTunes quality and what I was streaming from Bandcamp. Unfortunately the Bandcamp version of the song still sounded significantly better. I listened to it several times, and realized that the song in iTunes sounded muffled.
The solution to this problem was to go into the iTunes Playback settings and experiment with the options there.
In my case, the biggest culprit was the “Sound Check” setting, which “Automatically adjusts song playback volume to the same level.” That setting seems like a good idea, but what it also does is mess with the quality of the song. Once I disabled that setting, the songs in iTunes sounded just as good as the songs I was streaming from the Bandcamp site.
To disable that setting, follow these steps. First, go back to the iTunes Preferences by making iTunes the active application, selecting “iTunes” from the Mac menu bar, then selecting “Preferences”.
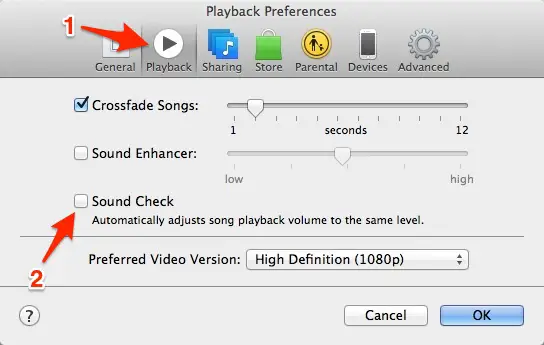
Next, as shown in the following dialog, click the “Playback” button, and then make sure the “Sound Check” checkbox is not selected. The correct setting to hear the best quality is shown in this image:
After doing this, click “OK” on the Preference dialog to close it, and then play your songs again. When I did this, the song I played from iTunes sounded just like the song I was streaming from Bandcamp. I was happy again.
What about songs downloaded from Apple or Amazon?
The first step in this article helps you improve the quality of songs that you import/rip from CDs. But what about songs that you download from sources like Apple or Amazon?
The short answer is, “I don’t know (yet).” I don’t download digital songs from Apple, but I do buy them from Amazon, so I’ll certainly check that out, and update this article with what I learn.
That being said, the second step in this article -- disabling the “Sound Check” in the Playback settings -- should improve the quality of all songs, including digital downloads.
Summary
If the song you’re hearing in your iTunes don’t sound as good as the songs you hear from other sources, such as YouTube or Bandcamp, try changing these settings in iTunes, and I think you’ll notice a dramatic difference in your iTunes sound quality.
As a final note, if you don’t want to import all of your songs from CDs again, you can try the second fix (disabling the Sound Check) first. That might make enough of a difference in the quality to make you happy. But if you really want the best quality, re-import the songs with a higher-quality bitrate setting.
books by alvin
 |
 |
 |
 |