| Developer's Daily | JBuilder Education |
| main | java | perl | unix | DevDirectory |
| JBuilder 2 now includes a wizard that lets you easily develop Java servlets with JBuilder. The wizard greatly simplifies the process, but if you don't have the JSDK installed on your system and configured as a JBuilder library, the project won't compile properly. In this article, we'll show you how to configure JBuilder for your servlet projects. |
Introduction
In our earlier article that demonstrated how to create a "Hello, world" Java servlet with JBuilder 2, we mentioned that it would be necessary to add the Java Servlet Development Kit (JSDK) JAR to your JBuilder environment before you could successfully compile your JBHelloWorldServlet. If you try to compile the JBHelloWorldServlet.java file without first adding the JSDK JAR file to your environment, the compilation attempt will fail.
In this article we'll show you how to add the JSDK JAR to your JBuilder
2 environment. Once you've added the JSDK JAR to your environment for one
project, you'll be able to quickly access it for your other JBuilder/servlet
projects.
Step 1: Download the Java Servlet Development Kit (JSDK)
If you haven't already downloaded the JSDK, in Step 1 you'll need to download it from Sun's web site. You can find the JSDK at java.sun.com. Just follow their installation instructions.
On my PC, I installed the JSDK in C:\JAVA\JSDK2.0, but you
can install your JSDK copy wherever you prefer.
Step 2: Find the location in JBuilder to add the JSDK
Once you have the JSDK installed on your system, you're ready to start configuring JBuilder. It takes only a few steps to make the JSDK available to all of your future JBuilder servlet projects.
First, start JBuilder. Once it's running, select Tools | Default Project Properties..., as shown in Figure 1.
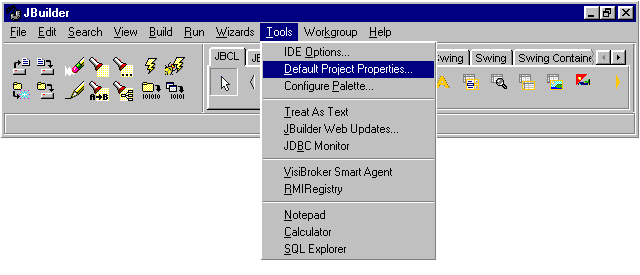
| Figure 1: | Start the configuration procedure by selecting Tools | Default Project Properties... . |
This brings up the Default Project Properties window, as shown
in Figure 2.
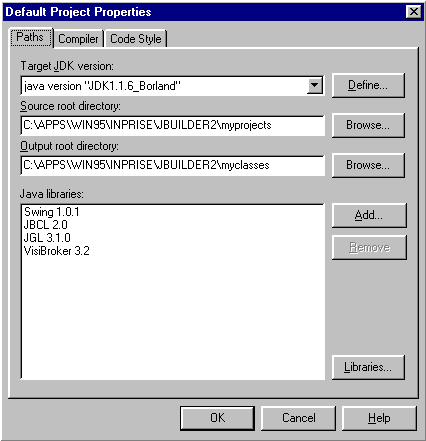
| Figure 2: | Selecting Tools | Default Project Properties...
brings up the Default Project Properties window. |
The "Java libraries:" section of the Default Project Properties window shows the libraries that JBuilder already knows about, and considers to be "default" libraries. As you can see, the JSDK is not one of those default libraries.
To see all of the libraries JBuilder knows about, click the Libraries... button. This brings up the Available Java Libraries window, as shown in Figure 3.
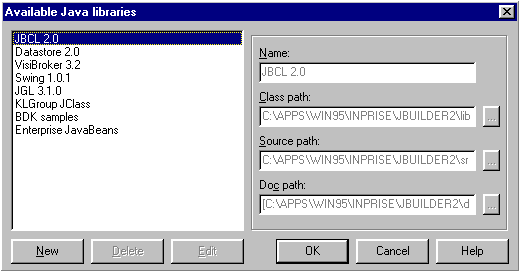
| Figure 3: | JBuilder does not have the JSDK in it's initial set of available Java libraries. |
As you can see from Figure 3, JBuilder does not have the JSDK
in it's set of available libraries. What we'll do in the next steps is
add the JSDK to this set of available libraries.
Step 3: Add the JSDK to JBuilder's Available Java Libraries
To add the JSDK to JBuilder's set of available Java libraries, click New in the Available Java libraries window. This clears the form in the right-hand portion of the window.
Fill in the form properties as follows (feel free to click on the ellipsis
buttons to locate the files on your system):
|
|
|
|
|
|
|
|
|
|
|
|
These values are also shown in Figure 4.
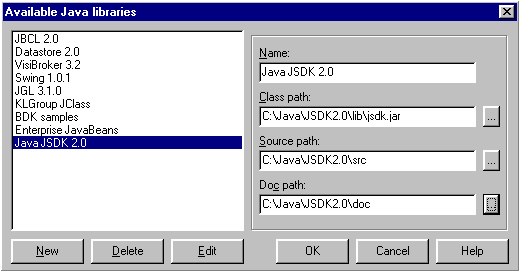
| Figure 4: | Enter the properties for the JSDK JAR file in
the form, then click OK
when you're finished. |
When you're finished adding the information on this form, click OK.
When you're returned to the Default Project Properties window, you can
click Add... to add the JSDK as a default library, but I'm not going
to do that. I don't create a lot of servlets with JBuilder just yet, so
I don't really think of it as a "default" JBuilder library. I'm just going
to click OK for now, and leave it as an "available" library.
Step 4: Add the JSDK 2.0 library to your project
Now, when I create a JBuilder servlet project and try to "make" the project, the make attempt will still fail until I add the JSDK 2.0 library to my project properties. (Note: This is my preference for now; as I mentioned, you can add the JSDK to your list of default libraries if you prefer.)
To add the JSDK 2.0 library to your current project properties, first make sure you have a project open. This might be our JBHelloWorldServlet project, for example.
With your current project already open in JBuilder, select File | Project Properties.... This brings up the properties window shown in Figure 5.
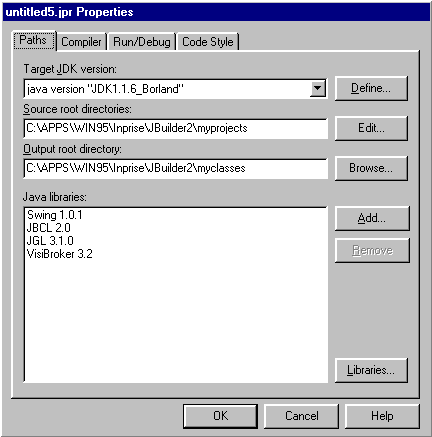
| Figure 5: | Click Add... in this window to add the
JSDK 2.0 library to your current project. |
Now, when you try to "make" your project again everything should compile
without errors!
Summary
JBuilder 2 now includes a wizard that lets you developer Java servlets with JBuilder. The wizard greatly simplifies the process, but if you don't have the JSDK installed on your system and configured as a JBuilder library, the project won't compile properly. In this article, we've shown you how to configure JBuilder for your servlet projects.
By default, the Java JSDK is not part of your standard JBuilder environment.
In fact, it may not even be on your computer. To add it to your JBuilder
environment, you need to download the JSDK and install it on your system.
Next, you'll add the JSDK to JBuilder's list of available Java libraries.
If you want, you can even make it a default library. If you don't
make it a default library, you'll need to add it to every servlet project
before you compile it. This is easily accomplished through the Project
Properties menu.
Copyright © 1998-2005 DevDaily Interactive, Inc.
All Rights Reserved.