Table of Contents
- 1) The res/xml/preferences.xml file
- 2) The res/values/array.xml file
- 3) Your Android Preferences activity
- 4) Java code to launch the PreferenceActivity
- 5) Saving/reading data
- Images
- Note: Android tablets, phablets, and landscape mode
- Full source code for my main launcher Activity
- Summary: Preferences tutorial for Android 5
Android FAQ: How do I create a Preferences UI in Android?
Solution: Creating a Preferences screen in Android isn’t too hard. The website rominirani.com has a very good preferences tutorial that just needs a minor update for Android 7, as a piece of the code shown there has been deprecated.
The steps to create an Android Preferences UI are:
- Define the UI in XML, using a
PreferenceScreenas the main component/container - As an optional step, populate some Android string arrays to use with your preferences components
- Write a
PreferenceActivityandPreferenceFragmentin Java code to show/handle the UI
I add a few more steps in the code that follows, but those are the basic steps. (Please note that the following code is about 95% of iRomin’s code, and 5% updates for Android 7.)
1) The res/xml/preferences.xml file
Define your Preferences UI using a PreferenceScreen as the main container, and fill it with the sub-components needed for your preferences. Put this code in a file named res/xml/preferences.xml to get started:
<?xml version="1.0" encoding="utf-8"?>
<PreferenceScreen xmlns:android="http://schemas.android.com/apk/res/android">
  <EditTextPreference android:title="Your Name"
                      android:key="username"
                      android:summary="Please provide your username"></EditTextPreference>
  <CheckBoxPreference android:title="Application Updates"
                      android:defaultValue="false"
                      android:summary="This option if selected will allow the application to check for latest versions."
                      android:key="applicationUpdates" />
  <ListPreference     android:title="Download Details"
                      android:summary="Select the kind of data that you would like to download"
                      android:key="downloadType"
                      android:defaultValue="1"
                      android:entries="@array/listArray"
                      android:entryValues="@array/listValues" />
</PreferenceScreen>
2) The res/values/array.xml file
iRomani’s code requires the following string array values, which he defines in a file named res/values/array.xml:
<resources>
<string-array name="listArray">
	<item>Headings</item>
	<item>Headings and Details</item>
	<item>All Data</item>
</string-array>

<string-array name="listValues">
    <item>1</item>
    <item>2</item>
    <item>3</item>
</string-array>
</resources>
(See my Android string array tutorial if you need to understand more about string arrays defined in XML.)
3) Your Android Preferences activity
The code here has been updated from iRomani’s tutorial, and contains the necessary corrections to work with Android 5, specifically using a PreferenceFragment along with the PreferenceActivity:
package com.alvinalexander.preferencestestapp;

import android.os.Bundle;
import android.preference.PreferenceActivity;
import android.preference.PreferenceFragment;

public class MyPreferencesActivity extends PreferenceActivity {

    @Override
    protected void onCreate(Bundle savedInstanceState) {
        super.onCreate(savedInstanceState);
        getFragmentManager().beginTransaction().replace(android.R.id.content, new MyPreferenceFragment()).commit();
    }

    public static class MyPreferenceFragment extends PreferenceFragment
    {
        @Override
        public void onCreate(final Bundle savedInstanceState)
        {
            super.onCreate(savedInstanceState);
            addPreferencesFromResource(R.xml.preferences);
        }
    }

}
4) Java code to launch the PreferenceActivity
You launch the PreferenceActivity just like any other Android Activity, with an Intent. This code shows that:
Intent i = new Intent(this, MyPreferencesActivity.class);
startActivity(i);
(The full source code for my “launcher” activity is shown down below, after the images.)
5) Saving/reading data
As iRomani discusses, you can save/read preferences data in other places of your application like this:
SharedPreferences SP = PreferenceManager.getDefaultSharedPreferences(getBaseContext());
String strUserName = SP.getString("username", "NA");
boolean bAppUpdates = SP.getBoolean("applicationUpdates",false);
String downloadType = SP.getString("downloadType","1");
As programming goes, that’s all you need to implement an Android Preferences screen. (For more information, please see that tutorial.)
Images
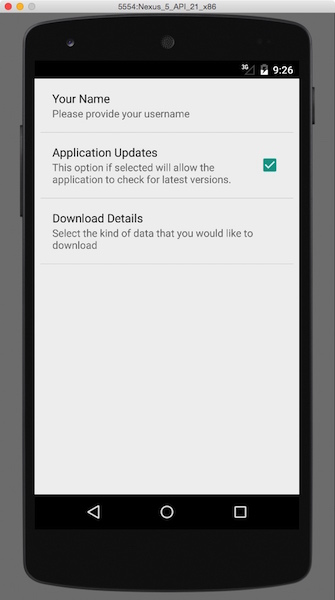
The following images show what this code looks like when run in a Nexus 5 API 21 Android emulator. First, here’s the main Preferences screen:
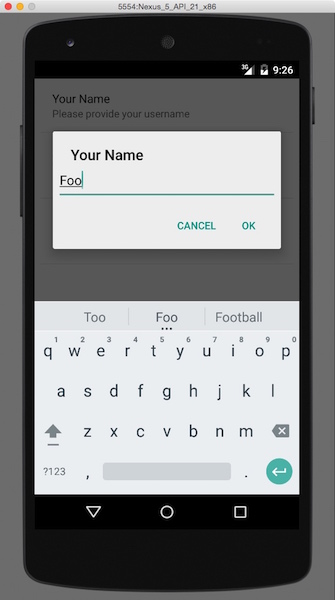
This image shows what the “Your Name” text field looks like:
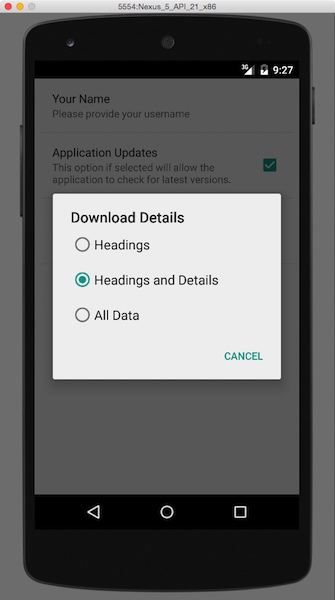
There isn’t anything to see with the “Application Updates” checkbox field, so I’ll skip that. This final image shows what the radio button field looks like:
Note: Android tablets, phablets, and landscape mode
I haven’t done anything yet to account for wider displays, such as tablets or using landscape mode on “phablets.” Whenever I need that for my own projects, I’ll update this tutorial, or write a new one.
Full source code for my main launcher Activity
I launch my Preferences screen from a button/icon in the Android options menu. Therefore, it may help to see my main, launcher activity, i.e., the one that launches the PreferenceActivity:
package com.alvinalexander.preferencestestapp;

import android.content.Intent;
import android.support.v7.app.ActionBarActivity;
import android.support.v4.app.Fragment;
import android.os.Bundle;
import android.view.LayoutInflater;
import android.view.Menu;
import android.view.MenuItem;
import android.view.View;
import android.view.ViewGroup;

public class MainActivity extends ActionBarActivity {

    @Override
    protected void onCreate(Bundle savedInstanceState) {
        super.onCreate(savedInstanceState);
        setContentView(R.layout.activity_main);
        if (savedInstanceState == null) {
            getSupportFragmentManager().beginTransaction()
                    .add(R.id.container, new PlaceholderFragment())
                    .commit();
        }
    }

    @Override
    public boolean onCreateOptionsMenu(Menu menu) {
        // Inflate the menu; this adds items to the action bar if it is present.
        getMenuInflater().inflate(R.menu.menu_main, menu);
        return true;
    }

    /**
     * react to the user tapping/selecting an options menu item
     */
    @Override
    public boolean onOptionsItemSelected(MenuItem item) {
        switch (item.getItemId()) {
            case R.id.menu_item_new_thingy:
                //Toast.makeText(this, "ADD!", Toast.LENGTH_SHORT).show();
                Intent i = new Intent(this, MyPreferencesActivity.class);
                startActivity(i);
                return true;
            default:
                return super.onOptionsItemSelected(item);
        }
    }

    /**
     * A placeholder fragment containing a simple view.
     */
    public static class PlaceholderFragment extends Fragment {

        public PlaceholderFragment() {
        }

        @Override
        public View onCreateView(LayoutInflater inflater, ViewGroup container,
                                 Bundle savedInstanceState) {
            View rootView = inflater.inflate(R.layout.fragment_main, container, false);
            return rootView;
        }

    } //end fragment

} //end activity
That code works with a menu defined in XML, which I saved in a file named menu/menu_main.xml:
<?xml version="1.0" encoding="utf-8"?>
<menu xmlns:android="http://schemas.android.com/apk/res/android"
      xmlns:myapp="http://schemas.android.com/apk/res-auto">
    <item android:id="@+id/menu_item_new_thingy"
          android:icon="@android:drawable/ic_menu_add"
          android:title="@string/new_thingy"
          myapp:showAsAction="ifRoom" />
</menu>
(I use a + icon for my cheesy example; you should use something else in your real code.)
Summary: Preferences tutorial for Android 5
In summary, if you want to put together a “preferences” screen in your Android 5 applications, I hope this code and images is helpful.
books by alvin
 |
 |
 |
 |