|


Getting started with Jar BundlerThe only things you need to get started are Apple's free Xcode Developer Tools, a Java application that you want to deploy, and an icon for your application (as I learned, this needs to be in Apple's "icns" format). I'm going to walk through the Jar Bundler process for a sample application I've named "WikiTeX". WikiTeX is an enhanced text editor, created as a Java application with a Swing/JFC interface. Like most Java applications, WikiTeX is organized as a collection of jar files, with one main jar file (wikitex.jar) and a small collection of other third-party jar files. Additionally, I have other separate files and directories that are used by my custom help system.
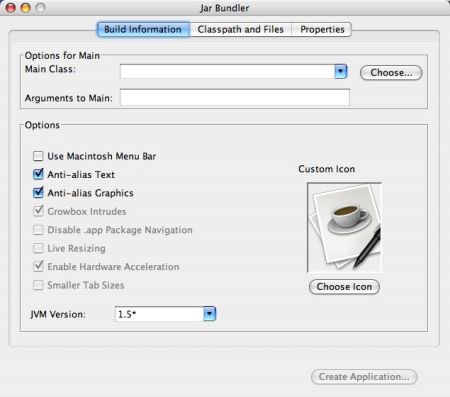
Starting Jar BundlerWith the Mac Xcode tools installed, you'll find the Jar Bundler application in the /Developer/Applications/Java Tools/ folder. (Start the Finder, click Macintosh HD, then open the Developer, Applications, and Java Tools folders, then double-click the Jar Bundler application.) When Jar Bundler starts up you'll see it's a simple one-screen application with three tabs named Build Information, Classpath and Files, and Properties. Figure 2.1 shows the application as it first starts up.
I start creating my application bundle by filling in the fields of the Build Information panel. The first field is labeled "Main Class", but I think that's a little misleading, at least when my application is already stored in a jar file. What really happens is that I click the "Choose..." button, then use the file chooser to locate my jar file. When I select that jar file, Jar Bundler is smart enough to detect that my "main" class is named com.devdaily.opensource.jelly.Main. ("Jelly" was the original name of the editor.)
An interesting note is that this is where you can tell that Jar Bundler itself is written in Java. When you click the "Choose..." button you'll see a strange looking file chooser dialog show up. This is the javax.swing.JFileChooser on the Mac. I learned recently that the java.awt.FileDialog actually looks more like a native Mac OS X file chooser than the Swing file chooser, so you want to use the older FileDialog. In this case the Jar Bundler developers used the newer javax.swing.JFileChooser, and the difference is striking. The second field, "Arguments to Main", lets me define any command-line arguments that I need to pass in to my main class, but I don't have any, so I just skip it.
The Options groupNext, in the "Options" group at the bottom of the panel, there are checkboxes that let me choose the Mac-specific options that I covered in my previous tutorial. The checkboxes that are enabled varies depending on the JVM Version you choose. Since my code is written with Java 5 syntax I choose JVM Version 1.5+, resulting in the options named "Use Macintosh menu Bar", "Anti-alias Text", and "Anti-alias Graphics" being enabled. Hmm, since these options are available, the first time through the wizard I'm going to use an older version of my WikiTeX application, and see what these checkboxes actually do. I know that they should add the Mac-specific arguments to the JVM that equate with these checkboxes, but I want to see how they do that, so I'll go ahead and select each checkbox.
Choose an application iconThe Build Information panel is also where I choose an icon for my application. I don't have a real icon, but I do have a JPG image, and I'll see if I can use that. (One bummer here: when I click the Choose Icon link I'm disappointed to see that the "open file" dialog didn't remember my path information. All of my information is in one directory, which seems like what most developers would do, and it would have been nice if Jar Bundler had remembered that directory as a default.) The file chooser is set to look for a file format of "Icon Files", i.e., those files with an extension of .icns. I don't have any of those, but fortunately I can change this field to look for "All Files", so I do that, click around to get to my working directory, then choose my JPG file. I don't know if this will work, but I'll give it a try. Because of the way the UI looks I'm tempted to click the "Create Application..." button, but I'll just move on to the next tab.
|