| Scrum! | |

|
Essential Scrum |
Mac batch image resizing FAQ: How can I "batch resize" images (photos) on MacOS (for free, preferably)?
A long time ago I wrote about how to batch resize images on MacOS from the command line in my How to batch resize images on MacOS using ImageMagick. That approach is fine for techies who don't mind cracking open the Mac Terminal application, using the Unix command line to navigate to their folder, and then process their images. But what about regular Mac users, those who don't want to ever see a Mac Terminal window?
A couple of weeks ago, as I was uploading a large collection of photos to my website about living in Alaska, I dug around, and finally cracked open the Mac Automator application, and found what I was looking for — a simple GUI approach to let me batch resize a collection of photos on my Mac.
Having used the Mac Automator application quite a bit for the last several weeks, I thought I'd share a short guided tour of how to batch resize images/photos on a MacOS system.
1) Free Mac image resizing - Make a backup
Before beginning the process of batch resizing your images, first make a backup of your images, preferably to another folder. It's very easy to make a mistake here, especially your first time through the process, and if you like your photos, you'll want to make a backup.
(Yes, that was a warning.)
2) Batch resize images with Mac Automator - create a new workflow
Once you've made a backup of your images, make sure you have a Finder window open that shows the images you want to batch process. You'll want this open so you can drag and drop your images to the Automator.
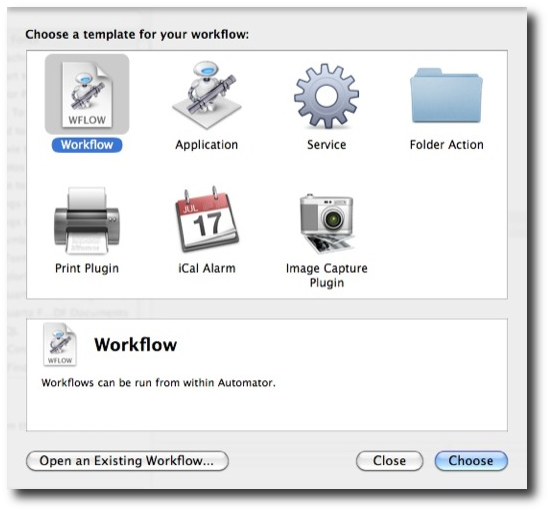
Now, to begin batch resizing your images, start the Mac Automator application. If you haven't used it before, click your Applications folder on the Mac Dock, then click the Automator icon, which looks like a robot.
When the Automator starts, it displays a startup dialog to ask how you want to proceed. Click the icon to start a new Workflow.
3) Add the photos/images you want to scale/resize
Once the Mac Automator has started, you'll see a large application window, with a big open area on the right:
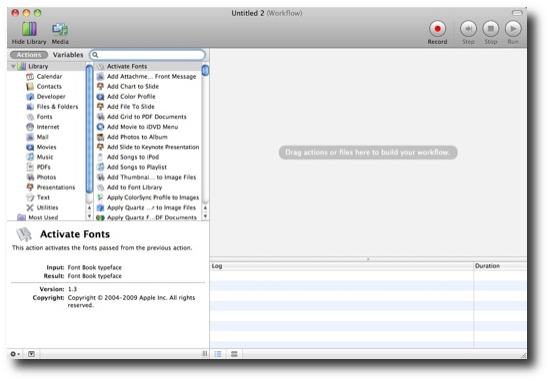
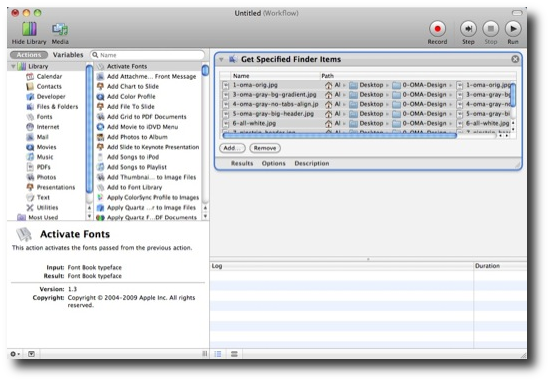
To start batch resizing your images, drag your images from your Mac Finder window to the big gray area on the right side of this Automator window. After adding your images, the Mac Automator will look something like this:
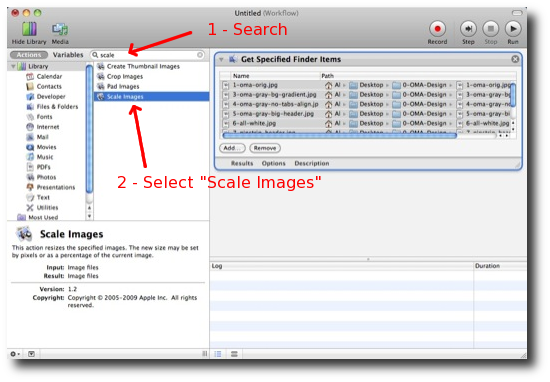
4) Mac batch image resize: Find and add the Mac Automator "Scale Images" action
Next, you'll need to find the "Scale Images" action on the left side of the Automator window. The easiest way to do this is to search for "scale" in the left window pane, and then select "Scale Images":
When you find the "Scale Images" action, double-click it to add it to the workflow tasks in the right window pane. The Automator should prompt you to optionally add a "Copy" task to your workflow:
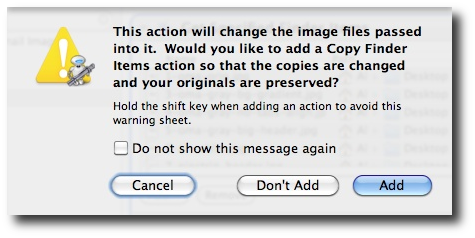
If you've already made a backup copy of your images you don't need to do this, but if you're really paranoid about your images, there's no harm in adding it. (Personally, I make a backup copy of my images manually, so I click "Don't Add" to skip this step.)
Once the Automator Scale Images action is added to your workflow, you'll want to set the pixel size. I've been working with my new Pentax K-x camera lately (see my Pentax K-x camera review, or Pentax K-x sample photos), which takes photos that are over 4,000 pixels wide, and I usually reduce those to 1,280 or 1,024 pixels to share on the internet. In this example I'm reducing the image size to 800 pixels, so in the "Size" text field I enter 800:
![]()
One word of caution here: This "size" field is a little vague. For instance, if your images aren't 800 pixels wide, the Automator will scale your images UP to 800 pixels wide. Or, if your image is something like 700 pixels wide, but 1,000 pixels tall, this Scale Image task will reduce the height to 800 pixels. I haven't found a way to control this behavior yet. So -- assuming you want to make the width of your images smaller -- it's important to make sure all your images have a larger width than the size you specify. I should also note that you can specify the size in "Percent" instead of pixels (using the drop-down box to the left of the size field), so that is one way around this problem.
5) Mac batch image resizing: Run the Mac Automator workflow
Once you have the pixel size set as desired, press the Automator Run button (the "play" button in the upper-right corner of the Automator window) to batch resize your images. If your Mac Finder window is still open, you'll see some updates in that window, and you'll also see messages posted in the Automator "Log" panel in the lower-right corner of your Automator window. I haven't had any errors with this process yet, so I don't have anything to warn you about here.

Now, if you look at each of your images in the Mac Finder window, you should see that they have all be resized to the size you specified.
Once you're satisfied that everything looks good, you can close the Mac Automator application. The Automator will prompt to see if you want to save this new workflow, but I don't do this, as the images I'll want to modify next time will be different than these images.
Free Mac batch image resizing - summary
I hope this tutorial on free Mac batch image resizing with the Mac Automator application has been helpful. If you have any questions, or improvements on this process, feel free to leave a note in the Comments section below.
books by alvin
 |
 |
 |
 |