Posts in the “android” category

macOS Android File Transfer error: Can’t access device storage (solved)

Android/macOS Solution: This article shows a solution to the Android File Transfer app “not working on Mac” problem, where you get the Android error message, “Can’t access storage device.” (This solution may also work on Microsoft Windows systems, though I don’t have a Windows system to test with to know for sure.)

Android “Can’t access storage device”

Last night I was trying to use the Android File Transfer program on my MacOS system to transfer music to my Google Nexus 9, which now runs Android 6 Android 7. After I connected my Nexus 9 tablet to the Mac with its USB cable and then started the Android File Transfer app, I saw this error message on my Mac:

Can’t access device storage. If your device’s screen is locked, disconnect its USB cable, unlock your screen, and then reconnect the USB cable.

This is what the Mac error message dialog looks like:
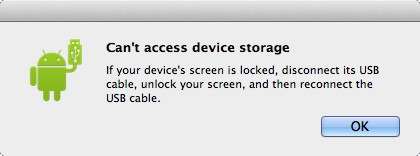
Android File Transfer - Can't access device storage

Unfortunately that’s a misleading and unhelpful error message, as the problem has nothing to do with the Android device screen being locked.

The solution

The solution to the problem on Android 7, Android 6 (and maybe Android 5) is to unlock your Android device (if it isn’t unlocked already), pull down the list of notifications, then tap the “USB for charging” notification:
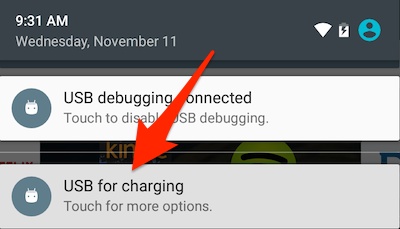
Tapping that notification brings up the following dialog:
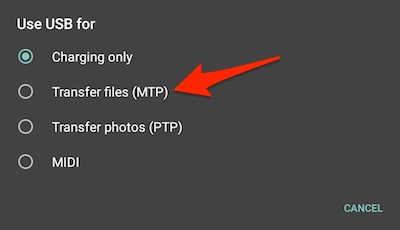
Transfer files (MTP)

On this dialog you want to tap the “Transfer files (MTP)” option, as indicated by that large red arrow.

Note that this option has changed names at least once. As of March, 2017, it is now labeled “Transfer files,” with the subtitle, “Transfer files to another device.”

When you do this, the Android File Transfer app will either automatically start (which it does on my Mac), or you can go ahead and start it manually, at which point you’ll see the Android File Transfer main window:
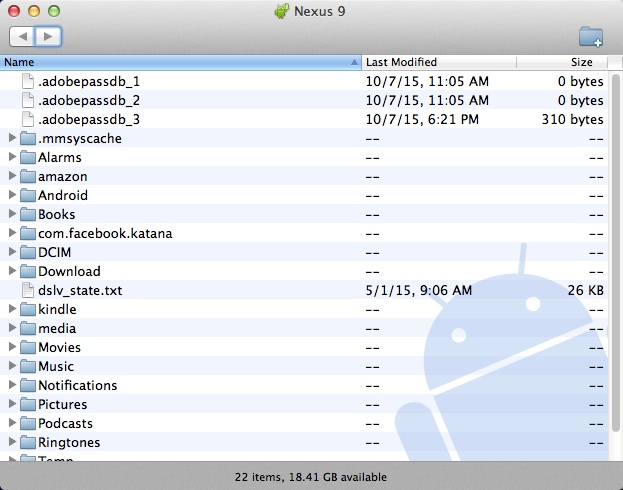
Android File Transfer app main window (success)

Once you see this window you can go ahead and start dragging files from your Mac (or Windows) computer to this Android File Transfer window.

Note: Be sure to click OK on the Mac

As Gert notes in the comments below, before you tap MTP on the phone, make sure you click “OK” on your Mac so that error message goes away.

A quick note about transferring music files

Note that if you’re transferring music files to your Android device, you’ll want to transfer them to the Music folder. To do this, double-click that folder to open it, then drag and drop music files from your PC into that folder. On a Mac you do this by opening a Finder window, navigating to the folder where your music files are located — such as /Users/Al/Music/iTunes/iTunes Music — and then dragging and dropping the files from the Mac Finder window to the Android File Transfer window. Then start the “Play Music” app on your Android device and you should see your files under the “Recent activity” area on the home page of that app.

Summary

In summary, if you get the “Can’t access device storage” error when using the Android File Transfer app when trying to transfer files from your Mac or Windows system to your Android phone or tablet, I hope this solution is helpful.

SQLite alter table syntax examples

SQLite FAQ: Can you show me how the SQLite ALTER TABLE syntax works?

At the time of this writing you can use the SQLite ALTER TABLE syntax for two purposes:

  1. Add a column to the end of an existing SQLite database table
  2. Change the name of a database table.

For other changes you'll have to follow some workaround procedures (discussed below).

[toc hidden:1]

SQLite: Default a datetime field to the current time (now)

SQLite FAQ: How do I default a SQLite datetime field to the current date and time? (Also asked as, How do I default a SQLite date/time field to now?)

Solution

Use the SQLite current_timestamp function to default a SQLite field to the current date and time, like this:

How to drop a SQLite database

SQLite database FAQ: How do I drop a SQLite database?

People used to working with other databases are used to having a DROP DATABASE command, but in SQLite there is no similar command.

The reason? In SQLite there is no "database server" — SQLite is an embedded database, and your entire database is contained in one file. So there is no need for a SQLite “drop database” command, all you have to do to drop the database is to delete the SQLite database file you were accessing.

An Android cheat sheet (my notes, main concepts)

This page is a little unusual for me; it’s basically a terse summary of what I know about Android. I created it because I tend to (a) work with Android for a few weeks or months, and then (b) get away from it for several months, so this page helps me reload everything into my brain.

Show SQLite tables from the Android command line shell (adb)

Android/SQLite FAQ: How do I show a list of SQLite database tables from the Android command line (adb shell)?

You can show a list of SQLite tables by starting the Android adb shell (command line tool), and then properly invoking the sqlite3 command. Here's an example of how this works, with comments shown before each command:

Android: How to send a message from a Thread to a Handler

[toc]

As a quick example of how to use a Thread with a basic Handler in an Android application, the following code creates a view where the text in the TextView is updated to show the current date and time when the Button is tapped.

Java source code

First, here’s the Java source code for a file class named ThreadHandlerActivity:

SQLite foreign key examples

SQLite foreign keys FAQ: Can you show me how to define foreign keys in a SQLite database table design?

The SQLite database does support foreign keys, and its foreign key syntax is similar to other databases. Here’s a quick SQLite foreign key example.

How to show an HTML string in an Android TextView

Filed under “What I learned about Android today,” it turns out that you can display an HTML string in an Android TextView. However, this approach has major limitations, and you’ll probably want to display your HTML in a WebView instead.

Skipping past that issue for a few moments ... if you want to try to display an HTML string in a TextView, you need to use the Android Html.fromHtml() method, as shown in this code:

How to create SQLite comments

SQLite FAQ: How do I create comments in SQLite?

SQLite lets you create comments using two different constructs, either two hyphens in sequence ("--"), or the "/.../" C-style comments. Here are examples of each approach, with the SQLite comments preceding the two database table definitions:

How to create a SQLite database

SQLite database FAQ: How do I create a SQLite database?

Creating a new database in SQLite is so easy, it's amazing. Once you have SQLite installed and your PATH set up properly, from your Unix or DOS shell, just issue a SQLite command like this:

SQLite backup: How to dump a SQLite database

SQLite dump/backup FAQ: How do I backup (dump) a SQLite database (or database table)?

"How to make a backup of a SQLite database?" is a really interesting question. Because a SQLite database is really just a file, if you truly want to make a backup of that database, it can be as simple as copying that file to a backup location.

But there is more to the story ...

[toc hidden:1]

SQLite CSV import examples

SQLite CSV FAQ: How do I import a CSV file into a SQLite database table?

If you’re not using an autoincrement (primary key) field in your database table, importing CSV file data into a SQLite database is straightforward, though you may have to do some work to clean up your data first. Let’s take a look at how this works.

A SQLite CSV import example

As a first example, assume that I have a SQLite database table defined like this:

[toc hidden:1]

SQLite: How to get the “autoincrement” value from the last insert

SQLite autoincrement FAQ: How do I get the autoincrement value from my last SQLite INSERT command?

You can get the integer value of the primary key field from the last insert into an autoincrement field using a SQLite function named last_insert_rowid(), as shown in the example below.