Last night I finally got some time to work with my new Arduino Uno board, and created a little "Hello, world" program. This program is just the same "LED on Pin 13" program I see repeated in every book and on every website, but it really is helpful when you're struggling to get started with the Arduino hardware, like I was.
In my case, it isn't the programming that's hard, it's a matter of trying to feel comfortable with making sure I've plugged all the pins and wires into the right breadboard and Arduino slots. I'm using the SparkFun Arduino Uno kit, which I thought would make getting started easier, but their wiring documentation is very terse for a hardware newbie.
Helpful links
The good thing about the SparkFun kit is that they give you a template (a piece of paper) that you place over the breadboard, and then you use that template as a guide to help you plug things into the correct slots. But again, the writing is terse, and I never would have gotten the first example right without their online video.
Another helpful link for first connecting an Arduino Uno to your computer is this "Getting Started with Arduino Uno" tutorial. That article shows how to connect your Arduino to a Mac computer, and there are also links for Windows and Linux users. It's important to know that before you can use the Arduino Uno board with your computer, there are several short configuration steps you need to follow to get things to work. I'm glad to report that when I followed those steps, everything worked just fine.
Arduino Uno and breadboard wiring
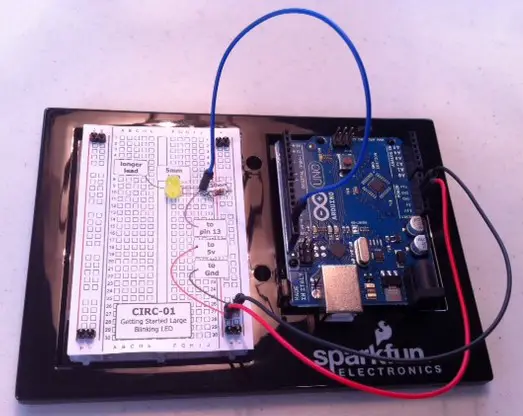
I don't know if this photo will help, but here's what the wiring looks like for my Arduino Uno and breadboard for this "Hello, World" example:

As you can see, I'm using the SparkFun kit, and if you can see it well enough, I have the LED connected to Pin 13 on the Uno board.
Also, it's hard to see it on the breadboard, but it's important to note that there is a 330-Ohm resistor on the breadboard, just to the right of the yellow LED and blue wire.
Arduino Uno "Hello, World" source code
As for the Hello, World source code (an Arduino "sketch"), it's on many websites, and is also included in the many Arduino application examples, and looks like this:
int pin = 13;

void setup() {
  // assumes the LED is connected to pin 13 on the arduino uno
  pinMode(pin, OUTPUT);
}

void loop() {
  digitalWrite(pin, HIGH);  // turn the LED on
  delay(1000);              // wait for a second
  digitalWrite(pin, LOW);   // turn the LED off
  delay(1000);              // wait for a second
}
Improving the documentation, and that 330 Ohm resistor
As mentioned, the Arduino SparkFun kit documentation is a little too terse. One thought that crossed my mind is, "Why do I have to use this 330 Ohm resistor? Why not a different resistor, or no resistor at all?"
I do have a copy of Getting Started with Arduino, which helps explain general electrical concepts, the Arduino, and breadboards, and I do know what a resistor is, but I have no idea why I need one in this circuit. I assume it's to keep the LED from starting on fire, or causing feedback that would make my Mac explode, but I really don't know any more than that right now.
Arduino Uno Hello, World example - Summary
To summarize this, if you're new to working with hardware things like the Arduino Uno controller and a breadboard, the video above is very helpful, and you need to follow the initial configuration steps on the Arduino website. Hopefully my photo helps a little as well.
Also, if you're thinking about buying any Arduino books like O'Reilly's Arduino Recipes books, I recommend putting that off until you really need it. The Arduino application comes with a wealth of example code for you to look at. With the Arduino application open, click File, then Examples, and you'll find a lot of examples to look at. Those examples will keep you busy for hours, and I'm not sure what the O'Reilly book would add to those.


