I’ve been writing books for ten years — such as the 2021 Scala Cookbook and Functional Programming, Simplified — so I haven’t had the time to work on many open source projects, and therefore, my ability to remember how to:
- fork a Github project
- pull it down
- create a git branch
- push that branch back, and then
- submit a pull request
are weak, at best.
That being said, I’ve done it a few times lately, so I’m getting better at it. Today was a very smooth process, so I thought I’d make these notes while they’re still fresh in my mind.
1) Fork the project
The first thing to do is fork a project on Github. That’s easy to do, just go to the web page for the project, click Fork, then wait while they fork is created. When it’s done you’ll have a new repository in your list of Github repositories.
2) Clone
Next, clone your forked Github project, i.e., git clone <projectName>. When I clone a Github project, the command looks like this:
git clone git@github.com:alvinj/TheProjectName.git
Update: In 2021 (I think), Github added a “Fetch Upstream” button/link on your cloned project page (which is now named “Sync fork” in 2023). This makes the process of keeping your cloned repo in sync with the main repo much easier.
3) Create a branch
Next, cd into that project directory on your local filesystem. First, you can list all of the project branches with this command:
git branch

# note: these commands really show all branches
git branch -a
git branch --all
Then create a new branch. For example, create a new branch named my-improvements, like this:
git branch my-improvements
4) Use that branch (make your changes)
Next, use that branch for your new edits. You do that by switching to it with the git checkout command:
git checkout my-improvements
You can always confirm what branch you’re currently working in with this command:
git branch
Its output should look like this:
master
* my-improvements
Now make all the edits/corrections/changes you need to make on this branch. Edit files, delete files, add new files and directories, etc.
5) Commit your changes
After you’re finished, add and commit your changes just like you’re working in master:
git add .
git commit -m "added my excellent changes"
6) Push the changes back to Github
Next, push your changes back to Github. To do this, first switch back to the master branch:
git checkout master
Now when you run git branch you should see this output:
$ git branch
* master
my-improvements
Now push the changes back to Github with this command:
git push origin my-improvements
When you do this, you’ll see some output like this at the command line:
remote: Create a pull request for 'my-improvements' on GitHub by visiting:
remote:      https://github.com/your_username/project_name_here/pull/new/my-improvements
This is nice, because it now gives you the URL to go to where you can complete your pull request.
7) Finish the process on the Github UI
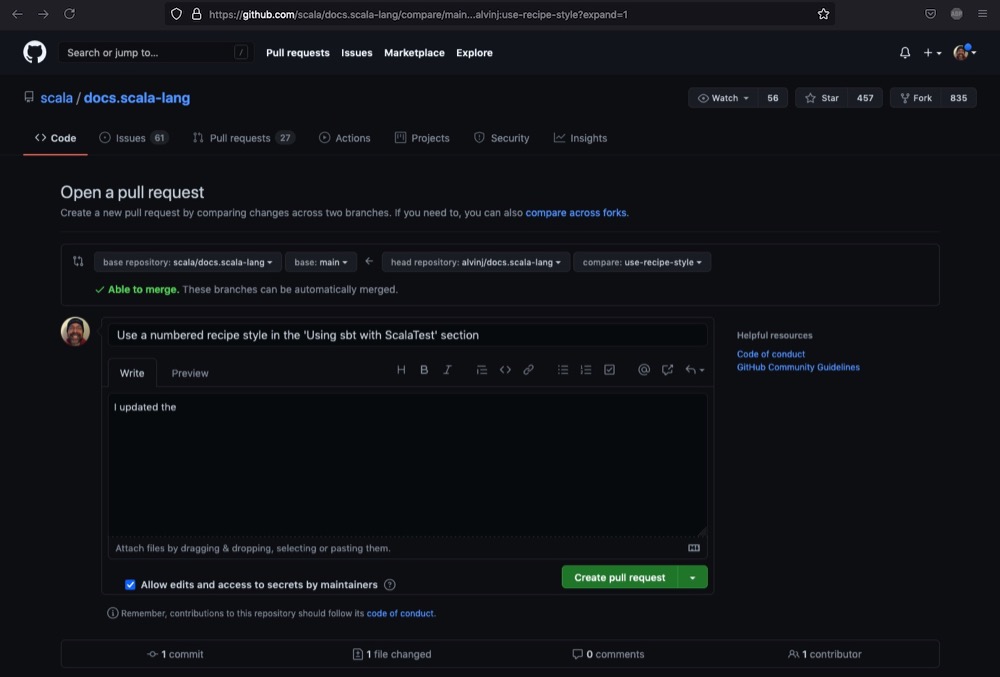
Now go to the URL Github gives you for your pull request. Fill out that form and submit it to complete the pull request process.
As of July, 2021, here’s an example of what the Github UI looks like when I submit a pull request on the Scala Documentation project:
Technically that’s the end of the process until someone on the other end does something with your pull request, so you’re finished for now.
Summary: Creating a pull request on Github
If you ever need to create a pull request on Github, I hope these notes are helpful. In summary, the steps are:
- Fork the project you want to contribute to
- Clone that new project from your forked Github repo to your computer
cdinto that project- Create a new branch with
git branch my-improvements - Use that branch with
git checkout my-improvements - Make all the changes you want
- When you’re finished, use
git add .andgit commitas usual - Switch back to
master(ormain) withgit checkout master - Push the changes back to Github with
git push origin my-improvements - Go to the link git gives you to complete the pull request process
Again, if you need to create a pull request on Github, I hope this is helpful.
Update: Keeping your fork in sync
As a “note to self”, these are some resources I read about in regards to keeping your fork in sync with the “upstream” master/main branch:
- https://gist.github.com/CristinaSolana/1885435
- https://docs.github.com/en/free-pro-team@latest/github/collaborating-with-issues-and-pull-requests/configuring-a-remote-for-a-fork
- https://docs.github.com/en/free-pro-team@latest/github/collaborating-with-issues-and-pull-requests/syncing-a-fork
- https://docs.github.com/en/free-pro-team@latest/github/using-git/pushing-commits-to-a-remote-repository
- https://medium.com/@topspinj/how-to-git-rebase-into-a-forked-repo-c9f05e821c8a
- https://medium.com/@sahoosunilkumar/how-to-update-a-fork-in-git-95a7daadc14e
| this post is sponsored by my books: | |||
 #1 New Release |
 FP Best Seller |
 Learn Scala 3 |
 Learn FP Fast |
My own experience today looks like this:
> git clone git@github.com:alvinj/docs.scala-lang.git
> cd docs.scala-lang

> git remote -v
  origin    git@github.com:alvinj/docs.scala-lang.git (fetch)
  origin    git@github.com:alvinj/docs.scala-lang.git (push)

> git remote add upstream https://github.com/scala/docs.scala-lang.git

> git fetch upstream
  # not much happened here
  From https://github.com/scala/docs.scala-lang
   * [new branch]        master     -> upstream/master

> git merge upstream/master
  # this had a LOT of output, as expected
  Updating ee65f7ff..9ac8ff20
  Fast-forward
   _overviews/scala3-book/ca-given-imports.md                  |  2 +-
   _overviews/scala3-book/ca-type-classes.md                   |  2 +-
   ... much more here ...
   _overviews/scala3-book/types-type-classes.md                |  2 +-
   _overviews/scala3-book/types-variance.md                    | 16 ++++++++--------
   38 files changed, 81 insertions(+), 74 deletions(-)

# `git branch` shows all of my branches
> gb -a
* master
  remotes/origin/HEAD -> origin/master
  remotes/origin/domain-tools-updates
  remotes/origin/getting-started-formatting
  remotes/origin/master
  remotes/origin/resolve-todos-1
  remotes/origin/tasty-end-users
  remotes/origin/update-why-scala
  remotes/upstream/master
I’m not yet a very good git user in a team environment, but I can at least share this information. :)
