If you ever need to run multiple Dart futures in parallel (simultaneously), I can confirm that this approach works:
Scala, Java, Unix, MacOS tutorials (page 91)
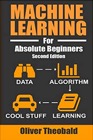
| A Machine Learning Bestseller | |
|
Machine Learning for Absolute Beginners |
So I pour some root beer in a Ball jar glass I use to drink from. I put some ice in it, then set it on the counter because I realize I left my glasses in the bedroom. In the bedroom I hear a cracking noise from the kitchen, but when I come back I can’t figure out what it was, so I assume it was the ice cracking in the root beer.
I pick up the Ball glass, take it to the computer area, then realize I now left my glasses in the kitchen. So I start walking to the kitchen, and the bottom of one of my feet feels a little wet. I can’t make sense of that, unless the Ball glass already started perspiring and dripped.
I come back to the computer area and find a little puddle of root beer under my glass. “Oh,” I think, “the root beer must have overflowed after I put the ice in. Strange I didn’t feel it on my hands.”
So I pick up the Ball glass and think, “Huh, that’s a lot of root beer under there,” so I take it back to the kitchen to rinse the glass under the sink. When I put the glass under the sink the bottom explodes and falls out.

Over the last two days I started to get my Just Be notifications working on Android. I’m rewriting the app using Flutter, and this is what a notification currently looks like if you do a long-press on the app icon after receiving a notification.

Notes from September 24, 2016:
Doctor: I’d like to collect a bone marrow sample ...
*Al runs out of the hospital in a hospital gown, screaming like a little girl*
(later, after they caught me)
Doctor: The next time you break out in a rash, hives, or blisters, I want you to have those biopsied.
Me: Is there going to be any part of our relationship that doesn’t involve a lot of pain on my part?
Doc: Yes, pee in this cup, and we’ll look at it under a fluorescent light to see if you have the same disease that King George III had.
Me: The crazy one?
Doc: Yes.
Me: Cool.
I recently created a command I named ffx that lets you search your filesystem for files that contain multiple strings or regular expressions. This post describes and demonstrates its capabilities. (There’s a little video down below if you want to see how it works before reading about it.)
If you need to get a random element from a list in Dart, I can confirm this this getRandomListElement method works:
As a quick note, here are a couple of examples of how to simulate a slow-responding Flutter/Dart method:
Future<bool> _getFutureBool() {
    return Future.delayed(Duration(milliseconds: 500))
                 .then((onValue) => true);
}

Future<bool> getEnableNotifications() async {
    final SharedPreferences prefs = await SharedPreferences.getInstance();
    return Future.delayed(const Duration(milliseconds: 1000), () {
        return prefs.getBool(KEY_ENABLE_NOTIFICATIONS) ?? false;
    });
}
As shown, the first example uses Future.delayed followed by a then call, and the second example shows Future.delayed with a lambda function.
You’ll want to use this code/technique when you’re working with Flutter futures and its FutureBuilder class.
I was reminded about the need to test things likes futures and FutureBuilder when some code I found on the internet wasn’t working properly. As a result I wrote my tutorial, How to correctly create a Flutter FutureBuilder.
As a quick note, in the Dart programming language, the ternary operator syntax is the same as the Java ternary operator syntax. The general syntax is:
result = testCondition ? trueValue : falseValue
Dart ternary operator syntax examples
A few examples helps to demonstrate Dart’s ternary syntax:
“All things that appear in this world are illusion. If you view all appearance as nonappearance, you will see your true nature.”
~ From the Diamond Sutra, via
Wanting Enlightenment is a Big Mistake
“There he goes. One of God's own prototypes. A high-powered mutant of some kind never even considered for mass production. Too weird to live, and too rare to die.”
~ Hunter S. Thompson, Fear and Loathing in Las Vegas
If you’re interested in Dart/Flutter programming, here’s a little example of how to pass a Dart function into another function or method. The solution is basically a three-step process.
Step 1: Define a Dart method that takes a function parameter
First, define a Dart method that takes a function as a parameter, such as this exec method:
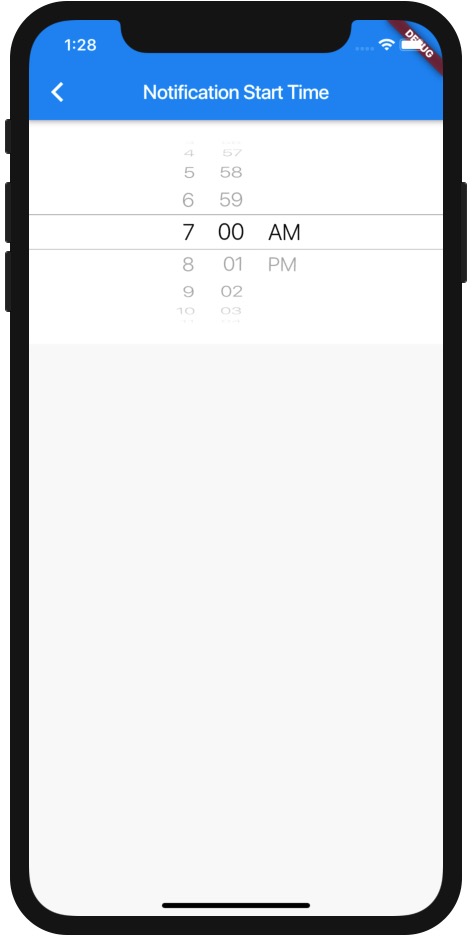
As a brief note, if you ever need to use the Flutter CupertinoDatePicker — a spinning wheel chooser — in “time-picker/time-chooser” mode, I can confirm that this example works:
child: CupertinoDatePicker(
    mode: CupertinoDatePickerMode.time,
    initialDateTime: DateTime(1969, 1, 1, _timeOfDay.hour, _timeOfDay.minute),
    onDateTimeChanged: (DateTime newDateTime) {
        var newTod = TimeOfDay.fromDateTime(newDateTime);
        _updateTimeFunction(newTod);
    },
    use24hFormat: false,
    minuteInterval: 1,
)
Note that even when you only want to set an initial time value, the CupertinoDatePicker in CupertinoDatePickerMode.time mode requires that you pass it a DateTime value, so I just give it a date/time back in 1969:
initialDateTime: DateTime(1969, 1, 1, _timeOfDay.hour, _timeOfDay.minute),
You can set the year, month, and day to whatever you want; the only important values in CupertinoDatePickerMode.time mode are the hour and minute.
A complete CupertinoDatePicker/CupertinoDatePickerMode example
If it helps to see a complete CupertinoDatePicker/CupertinoDatePickerMode example, here you go:
import 'package:flutter/material.dart';
import 'shared_prefs_helper.dart';
import 'package:flutter/cupertino.dart';

class PreferencesSelectTime extends StatefulWidget {
    String _title;
    TimeOfDay _timeOfDay;
    Function _updateTimeFunction;

    PreferencesSelectTime(this._title, this._timeOfDay, this._updateTimeFunction);

    @override
    PreferencesSelectTimeState createState() => PreferencesSelectTimeState(_title, _timeOfDay, _updateTimeFunction);
}

class PreferencesSelectTimeState extends State<PreferencesSelectTime> {

    String _title;
    TimeOfDay _timeOfDay;
    Function _updateTimeFunction;
    PreferencesSelectTimeState(this._title, this._timeOfDay, this._updateTimeFunction);

    @override
    Widget build(BuildContext context) {

        return Scaffold(
            appBar: AppBar(
                title: Text(_title),
            ),
            body: FutureBuilder<TimeOfDay>(
                future: SharedPreferencesHelper.getStartTime(),
                builder: (BuildContext context, AsyncSnapshot snapshot) {
                    if (snapshot.connectionState == ConnectionState.done) {
                        return Container(
                            height: MediaQuery.of(context).size.height / 4,
                                child: CupertinoDatePicker(
                                    mode: CupertinoDatePickerMode.time,
                                    initialDateTime: DateTime(1969, 1, 1, _timeOfDay.hour, _timeOfDay.minute),
                                    onDateTimeChanged: (DateTime newDateTime) {
                                        var newTod = TimeOfDay.fromDateTime(newDateTime);
                                        _updateTimeFunction(newTod);
                                    },
                                    use24hFormat: false,
                                    minuteInterval: 1,
                                )
                        );
                    } else {
                        return new CircularProgressIndicator();
                    }
                }
            )
        );
    }
}
I call that code from another widget like this:
onTap: () {
    Navigator.push(
        context,
        MaterialPageRoute(builder: (context) => PreferencesSelectTime(
            'Notification Stop Time',
            _stopTime,
            SharedPreferencesHelper.setStopTime
        ))
    );
},
It generates a Flutter screen/widget that looks like this:
Summary
In summary, if you ever want to use the Flutter CupertinoDatePicker in “time picker” mode, I hope this example code is helpful.
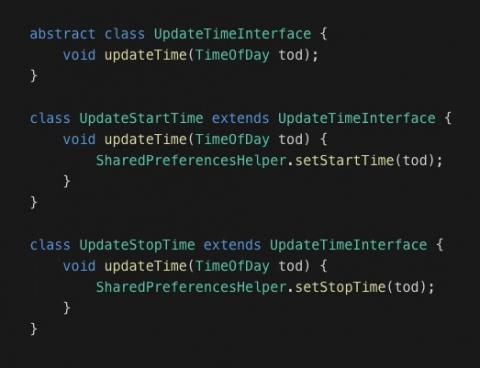
I initially thought you couldn’t pass functions around in Dart (you can!), so I had to remember what we used to have to do with interfaces and inheritance. (See the image.)
Put another way, when you have the ability to pass functions into functions, it eliminates this kind of code interface/inheritance code.
When I first studied Zen, I had a very hard time with this concept. I tried to focus very hard on the present moment, and also on being kind, and as a result, I didn’t always do what was really best for the situation. Over time, you figure out how to respond properly.
If you’ve ever had a Siberian Husky, you’ll probably find that these drawings and captions are accurate. (Image from snowdog.guru.)

After some more medical tests tomorrow (Tuesday) I hope to be able to return to work as early as Wednesday. I don’t really have much energy yet, but hopefully I can get back to writing Scala code and blog posts for two to four hours a day initially.
My ideal job would be to work as a QA guy for the Talkeetna Roadhouse bakery but after getting my full energy back I’ll probably settle for some sort of programming gig instead. :)

The Dancer Upstairs may be a little slow for most other people, but it’s one of my favorite movies (except for the dog parts).
Released in 2002, it was the first or second movie I saw Javier Bardem in, and when you watch it not knowing who he is, you say to yourself, “This guy has it,” that special something that makes you want to watch. As a friend once said, Tom Hanks is like that; if they made a movie about a guy stranded on an island and he was the only one in the movie, she’d watch the movie just because it was him (as did many other people).

I was writing with a friend recently about trying to find a way to love all beings, and she sent me this quote:
“I leave you free to be yourself: to think your thoughts, indulge your tastes, follow your inclinations, behave in ways that you decide are to your liking.”
When I read that it made me think something like, “I love you (your spirit), and I acknowledge that you’re a separate being here on Earth. I can’t control you, I can’t make you act in a way that I want you to behave (i.e., in a non-harmful way), so I just have to let you be, so you can work out your own karma.”
For some reason that gives me hope that there is a way I can love all beings (not just the good ones).
Namaste, Al
September, 2014, represented a changing of the guard for me. The old Toyota RAV4 was both a good and bad experience, and today I traded it in for the official car of Colorado, a Subaru Outback. As you can see from the photos, the two cars are somewhat similar in design and color. (The top photo was taken in Coldfoot, Alaska, a very small “town” about halfway between Fairbanks and Deadhorse, Alaska.)

| A Machine Learning Bestseller | |
|
|
Machine Learning for Absolute Beginners |