I spent several hours today working with the Gimp software application today, mostly doing work in trying to create textured areas, canvas backgrounds, and irregular lines (like chalk lines), and I’m writing this post for myself so I can remember everything I tried, and specifically what worked.
How to draw a straight line in Gimp
I think I’ve written this before, but to draw a straight line in Gimp:
- Click a spot to make one point.
- Hold down the [Shift] key, move the mouse to the end spot, press click, and you have a straight line.
How to draw a straight but not a smooth line
To create a straight line that looks like a chalk line:
- Choose the paint tool.
- Set the foreground color.
- Set mode to dissolve.
- Set opacity to about 92%.
- Set the brush size as desired (happened to be an 11 today).
- Draw your line as desired.
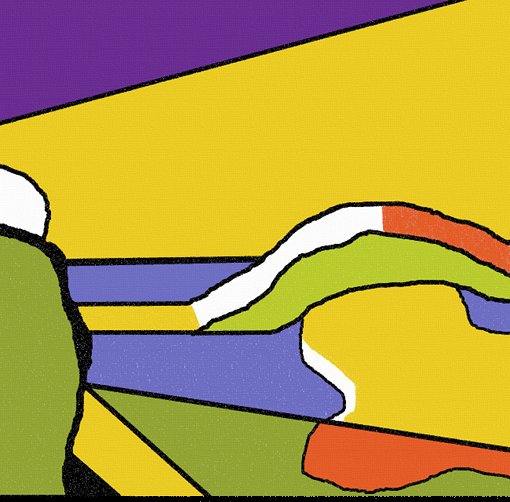
To make the line even different, you can “Apply jitter” to your line. (You can see these effects in the image I just shared down below.)
Vary line thickness while drawing
There are several things you can do to vary your line thickness while drawing. Under Brush Dynamics within the Pencil and Paint tools:
- Vary size by velocity
- Vary size randomly
- Vary size by pressure
I assume that last setting works if you have a digitizing tablet, but I didn’t have one today.
When you need a really large Gimp brush
When you need a really large/wide Gimp brush, you can:
- Set the brush to the largest size.
- Increase the Scale setting as desired. Anything over 1.0 makes it larger.
I’ve been using Gimp for a long time, and had no idea how to create a large Gimp brush size like this until I stumbled on this feature by accident today. (It feels weird to choose a brush size, then scale it.)
Create a textured background with canvas
The easiest way to create a textured background is with the Gimp Canvas filter:
- Create a background however you want.
- Go to Filters, Artistic, Apply Canvas.
- Change the settings as desired. I normally just use a Depth of 1, but every design is different.
Create a textured background with Bucket Fill and pattern fill
Another easy way to create a textured background is with the Gimp Bucket Fill tool:
- Set your foreground fill color, choose the Bucket Fill tool.
- Set Mode to Dissolve.
- Choose a Fill Type of Pattern Fill, then use either Corkboard, Ice, or Marble.
- Fill your area.
- Change Pattern Fill back to FG Color Fill. Re-fill your area. You may want to choose an opacity setting here less than 100%, but still something high like 99% or even higher.
Create a textured background with Fog and Noise
Another way to create a textured background:
- Create a background using Bucket Fill or other.
- Create a Cloud/Fog effect using a slightly different color. (Go to Artistic, Render, Clouds, Fog, change settings.)
- Merge layers down when happy.
- Go to Filters, Noise, Poisson, choose 13 photons, lumin. noise, gamma correct. Apply.
- Repeat as desired.
Create a textured background with Clothify
You can use the Gimp Clothify artistic setting to create a textured background:
- Create your initial background as desired.
- Select Filters, Artistic, Clothify.
- I just used settings of BlurX
3, BlurY3, Azimuth360, Elevation90, Depth=1, but you can vary these as desired to get different effects.
This tends to give your background a little bit of a "leather" feel to it and make it a little darker. I've only tried this with a few colors, so I imagine these settings will have to change a lot for different colors.
Create a textured background in a selected area
You can also just use a textured background in a selected area. Use one of the three selection tools -- including the Lasso Tool for irregular areas, then use one of the methods shown above.
Other Gimp textured background approaches
There are many other textured background approaches you can take with Gimp, including using the Gimpressionist tool (Filters, Artistic, Gimpressionist):
- Weave was an excellent choice for what I needed today
- Canvas
- etc.
For each of these, make sure you click Apply, then Update in the Preview area to save yourself some time. Also make sure you press Reset, unless you want to combine effects.
You can also combine these effects with Paper and Brush settings:
- Weave preset plus Marble paper was also very good
- Weave preset plus Burlap paper was also very good
- Canvas paper plus a Sponge01 brush was excellent
Be sure to adjust the Scale and Relief settings to see how those work.
A Gimp textured background example
As one quick example of an image with a textured background and black, chalky lines, here's an image I created as an exercise today:

You may not be able to see it in this small image, but in the larger image — and more importantly the printed image — you can see the textured background as desired.
Other effects in selected areas
You can also use many other Gimp effects after selecting an area with the selection tools, including but not limited to:
- Blur it
- Bucket fill it
- Gradient fill it
- Apply textures
- Much more ...
Create a foreground font color to match the background color
Have you ever seen those cool designs where there is something like a light-green text used on a dark green background, and wondered how they blended those colors so well?
There are at least two ways to do this. First, you choose a great foreground color to match your background color. Maybe that's what the great designers do.
Second, you can:
- Fill your background color as desired.
- Set your foreground color to white.
- Select the Text Tool and font as desired.
- Reduce the Opacity setting on your text as desired to achieve the desired effect.
With this approach your white font gains as much of the background color as you want it to. Of course you can leave it as all white for bold designs, but for cool designs, let some of that background color come through your letters, and your text will blend in naturally.
Create a cartoon sketch of yourself
There are a lot of ways to use Gimp to create a cartoon from a photograph of yourself or anyone else, but the approach I prefer is:
- Open a photo of yourself.
- Create a new, transparent layer.
- Use the Paint or Pencil tool and any desired line techniques. Start with a black line and a very low Opacity setting, something like 10% or 20%, until you get the feel for what you're doing.
- On your transparent layer, sketch lines of whatever features you want to include in the cartoon, things like your hair, eyebrows, eyes, nose, mouth, facial outline, etc.
With this technique you're creating a sketch of yourself on the transparent layer. You'll also want to create a plain white layer, and put it between your photo and your transparent layer. You can then enable the white layer to see what you've sketched, and disable the white layer to see your lines sketched over your photo. (You can do this very easily in the Layers Dialog.)
Some people may not like that approach because it's a manual process, but I've created several excellent sketches of relatives this way, and they keep asking me for more.
Gimp textured background and lines tips - Summary
I hope this collection of Gimp textured background and line tips has been helpful. It's an unusual article in that I normally try to focus on one topic, but I wanted to make sure I had notes of everything I tried today.


