iPod/iPhone wireless networking FAQ: How do I set up my iPhone or iPod on a wireless (WiFi) network?
About two years ago I set up my sister's house with a wireless network ("WiFi"), using a Cisco/Linksys wireless router/firewall device connected to their ISP. A few days ago she called and said my nieces just got iPod Touch devices, and they wanted to set them up to use the home wireless network. It has been a little while since I last configured an iPhone or iPod on a WiFi network, so I made a few notes about how to do this, and I'm sharing those notes here.
1) iPhone wireless setup - Begin with iPhone Wi-Fi settings
The first thing you need to do to set up your iPod or iPhone on your wireless network is to tap the "Settings" icon on the main screen of your iPod or iPhone. When you do that you'll be presented with the following iPhone Settings panel:

On this panel, tap the "Wi-Fi" settings button (the second one from the top).
2) Select your wireless network
On the following screen, you want to choose your wireless network. If your wireless network name is being broadcast, it should appear in the list under the "Choose a Network..." label. This is probably the case in 90% of all installations.
However, if your network name is not being broadcast -- as hers is not -- you'll want to tap the "Other..." button. (It's a little safer not to broadcast your wireless network name, so I always turn this off, which you can easily do with a Cisco router.)
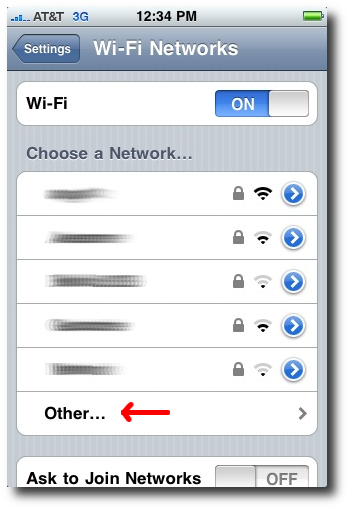
(Note: I've blurred out the names of my neighbor's wireless networks in all of these photos.)
3) iPhone wireless setup - Enter the wireless network name
If your wireless network name is not being broadcast, the next step in your iPhone wireless network setup is to manually enter the wireless network name on the next screen, so do that here in the "Name" field:

4) iPhone setup - Choose a wireless network security protocol
After entering the wireless network name, tap the "Security" button, and it will take you to a panel where you can choose the type of security protocol for your wireless network. Hopefully you know what your security protocol is, but if not, you can experiment here. Personally, I usually choose the "WPA2" wireless protocol when setting up wireless networks, so that might be a good one to start with. Most home networks are probably WEP, WPA, or WPA2.

Once you've selected your wireless network protocol, tap the "Other Network" button at the top of the screen to go back to the previous panel.
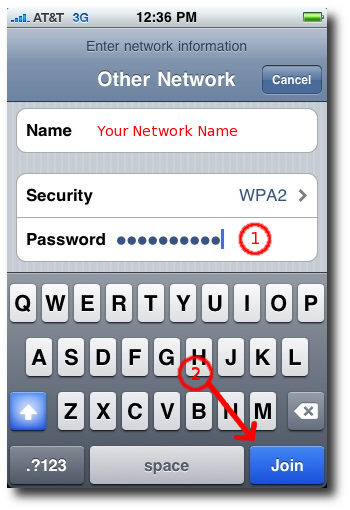
5) iPhone wireless setup - Enter your wireless network password
Here you'll see that the panel has changed, and there is a new password field here. Your wireless network should have a password, and that was assigned when your wireless router was configured. Enter that password here (Step 1 below), and then tap the "Join" button (Step 2 below) after that:
When you press the Join button, if everything works, you'll be taken back to the main iPhone/iPod Wi-Fi Networks panel, and you should see a checkbox next to your wireless network name, like this:
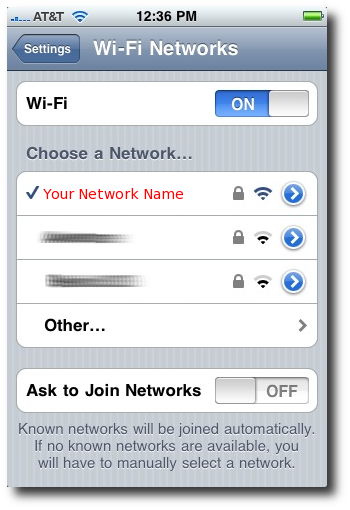
When you see this check mark next to your wireless network, this means that you have successfully joined the wireless network, and you should now be able to surf the web, check your email, etc.
iPhone/iPod wireless network setup - summary
I hope this iPhone/iPod wireless network setup tutorial has been helpful. When I was working with my sister over the phone, I was surprised at how complicated this can seem for people who aren't computer programmers, so I thought it would be helpful to share the iPhone Wi-Fi setup notes here.
books by alvin
 |
 |
 |
 |