This is the first tutorial in a three-part series on getting started with Scala.js. This tutorial will provide the proverbial “Hello, world” introduction. After this “Hello, world” tutorial, the next two tutorials will show some more powerful things you can do with Scala.js.
As a bit of a warning, this first tutorial is extraordinarily similar to the basic Scala.js tutorial. I didn’t mean to copy that introduction as much as I have, but they introduce the steps in a logical, orderly manner, so our approaches are very similar. My next two tutorials will make a significant detour from their introduction.
1. Prerequisites (what you need to get started)
To get started you’ll need to have these things installed on your system:
On a Mac I installed Node.js with the brew install node command, but you can also follow that link to install it with their installers.
2. Create a new SBT project
The first step in the process is to create a new SBT project. You can use my sbtmkdirs script or whatever process you normally use to create an SBT directory. For the purposes of this tutorial I name my directory ScalaJSHelloWorld. After you create the directory, cd into it.
If you use sbtmkdirs to create the project directory structure, you can remove the unnecessary directories with these commands:
rm -rf src/main/{java,resources}
rm -rf src/test
An IDE?
Feel free to work with this project while using an IDE like IntelliJ IDEA, Eclipse, or MS Code. A great benefit of Scala.js is that you can work with your code in an IDE and get all of the great IDE features — like code-completion and other type-safe benefits — that you normally get when writing Scala code.
Edit build.sbt
Next, edit the build.sbt file so it looks like this:
name := "Scala.js Hello World"
version := "1.0"

enablePlugins(ScalaJSPlugin)
scalaVersion := "2.12.8"                  // or any other Scala version >= 2.10.2
scalaJSUseMainModuleInitializer := true   // this is an application with a main method
I highly recommend keeping the name the same as what’s shown. That name is used to generate files later in this process, and it will be easier if you start with this name. You can always change it later once you understand how everything works.
As it’s stated in the SBT plugins documentation, “the enablePlugins method allows projects to explicitly define the auto plugins they wish to consume.” Also, per the Scala.js basic tutorial page:
“Since we have set
scalaJSUseMainModuleInitializer := truein the build, theTutorialApp.main(args: Array[String])method is automatically called at the end of the-fastopt.jsfile (with an empty array as argument).”
I’ll write more on that shortly.
Edit files under project
Next, add this line to your project/plugins.sbt file:
addSbtPlugin("org.scala-js" % "sbt-scalajs" % "0.6.28")
That line tells SBT how to download the Scala.js library.
Then add this line to the project/build.properties file:
sbt.version=1.2.8
That tells SBT to use version 1.2.8 to build this project. If you haven’t used this setting before, it’s a nice way to make sure that everyone on a project uses the same SBT version to build the project.
3. Create a Scala/Scala.js file
Next, create a Scala source code file named src/main/scala/hello/Hello1.scala. Because this tutorial series will create several different “Hello, scala” examples, I use the number 1 in both the file and class name. Put these contents in that file:
package hello

object Hello1 {
    def main(args: Array[String]): Unit = {
        println("Hello, world")
    }
}
As shown, this is a simple Scala object with a main method. There’s nothing unique to Scala.js (or JavaScript) about this file.
4. Compile and run the Scala code
Next, start SBT:
$ sbt
Inside the SBT console, issue the run command, where you should see output like this:
sbt> run

[info] Updating ...
[info] Done updating.
[info] Compiling 1 Scala source to target/scala-2.12/classes ...
[info] Done compiling.
[info] Fast optimizing target/scala-2.12/scala-js-hello-world-fastopt.js
[info] Running hello.Hello1
Hello, world
As shown, Hello, world is printed out after the code is compiled.
It’s important to note that this code is executed by Node.js. The Scala.js basic tutorial states that you’ll see a reference to Node.js in the SBT output, but I don’t see that in mine, even if I run the last command after executing run, so I assume that has changed since that tutorial was written. That being said, I was able to confirm that Node.js is needed because I initially had a problem with my Node.js installation and I saw error messages here.
An important thing to notice is that the SBT run command creates this file:
target/scala-2.12/scala-js-hello-world-fastopt.js
A few notes about this file:
- The filename is based on the SBT project name ("Scala.js Hello World"). This is why I recommended earlier that you use my project name in your build.sbt file — so our resulting filenames would be the same. The file-naming process adds
-fastopt.jsto a file-ized version of your SBT project name. - If you look at the resulting target/scala-2.12/scala-js-hello-world-fastopt.js file with
cat,more, orvim, you’ll see that it contains over 2,900 lines of some seriously ugly JavaScript source code. - At the end of that file you’ll see a line of code that looks like this:
$m_Lhello_Hello1$().main__AT__V($makeNativeArrayWrapper($d_T.getArrayOf(), []));
While it’s hard to grok what’s going on there, I can say that the hello_Hello1 refers to the Hello1 object in the hello package, main refers to its main method, and the $makeNativeArrayWrapper($d_T.getArrayOf(),[])) code passes an empty array into main. This is essentially how the main method of your Hello1 class is invoked in the generated JavaScript. While I tend to think that the ugly JavaScript code is calling the Scala code, it’s more accurate to say that the Hello1 object is completely compiled into that JavaScript.
If everything works so far, congratulations, this is a first step towards using Scala.js.
5. Use Scala.js-generated JavaScript in a browser
Those first steps got our feet wet in the Scala.js world, so let’s take the next step and do a little something with JavaScript in a browser.
a. Update build.sbt
To do this we’re going to need to work with the DOM, so the first step in the process is to add this line to the build.sbt file:
libraryDependencies += "org.scala-js" %%% "scalajs-dom" % "0.9.7"
This lets us use a Scala.js DOM library in our Scala code, which we’ll do in a few moments. It’s interesting to note that this DOM library is one of many JavaScript facade libraries for Scala.js. (See the Facade pattern on Wikipedia if you don’t know what that means.)
After adding that line to your build.sbt file, go back to the SBT console and issue the reload command so it will use this new library:
sbt> reload
b. Create hello1.html
Next, in the root directory of your project, create a hello1.html file with these contents:
<!DOCTYPE html>
<html>
  <head>
    <meta charset="UTF-8">
    <title>Scala.js Hello, World</title>
  </head>
  <body>
    <!-- include Scala.js compiled code -->
    <script type="text/javascript" src="./target/scala-2.12/scala-js-hello-world-fastopt.js"></script>
  </body>
</html>
The important thing to notice in that code is that it includes the scala-js-hello-world-fastopt.js JavaScript file. We’ll regenerate that file in a few moments after we update the Hello1.scala code.
c. Update Hello1.scala
To make this example do something interesting, we need to update our Hello1.scala code to use the DOM, so edit it to look like this:
package hello

import org.scalajs.dom
import dom.document

object Hello1 {

    def main(args: Array[String]): Unit = {
        val parNode = document.createElement("p")
        val textNode = document.createTextNode("Hello, world")
        parNode.appendChild(textNode)
        document.body.appendChild(parNode)
    }

}
The import statements in the code bring the Scala.js DOM library dom and document into scope, then the code inside main looks remarkably like JavaScript code that’s written in Scala. If you haven’t written JavaScript code to work with the DOM before, this code might not make much sense, but if you have written it before it should look pretty standard.
d. Use fastOptJS
With the hello1.html and the Hello1.scala files in place, the next thing to do is to tell SBT to generate the JavaScript file we need. You do this with the SBT fastOptJS command:
sbt> fastOptJS
Per the Scala.js Building page, fastOptJS “will perform fast Scala.js-specific optimizations and write the resulting code to a single JavaScript file.” Per the Scala.js Fast Optimizing document, “The result of fast optimization is typically between 1.5 MB and 2.5 MB.” On my system the resulting target/scala-2.12/scala-js-hello-world-fastopt.js file is 3,009 lines long.
Now if you open the hello1.html file in a browser — such as with the open hello1.html command in macOS — you should see the words “Hello, world” appear in your browser. (Depending on where you created your project, the URL for the file will be something like file:///Users/al/ScalaStuff/ScalaJSHelloWorld/hello1.html)
In summary, the end result of hello1.html, Hello1.scala, the fastOptJS command, and all the configuration stuff is that the words “Hello, world” appear in your browser.
e. Have a little fun
If you want to have a little fun, feel free to experiment with this code. I recommend putting these two lines of code anywhere inside the main method in the Hello1.scala file:
println("foo")
System.err.println("bar")
The run fastOptJS again, reload your web page, and look at your browser console, such as with these steps:
- Chrome: Right click > Inspect, then Console
- Firefox: Tools > Web Developer > Toggle Tools, then Console
You should see that “foo” is printed in a normal color, and “bar” is printed in red. This can be a simple way to help debug your Scala.js apps.
Scala.js benefits
Before I wrap up this article, the Scala.js home page shows the benefits of Scala.js compared to other technologies:
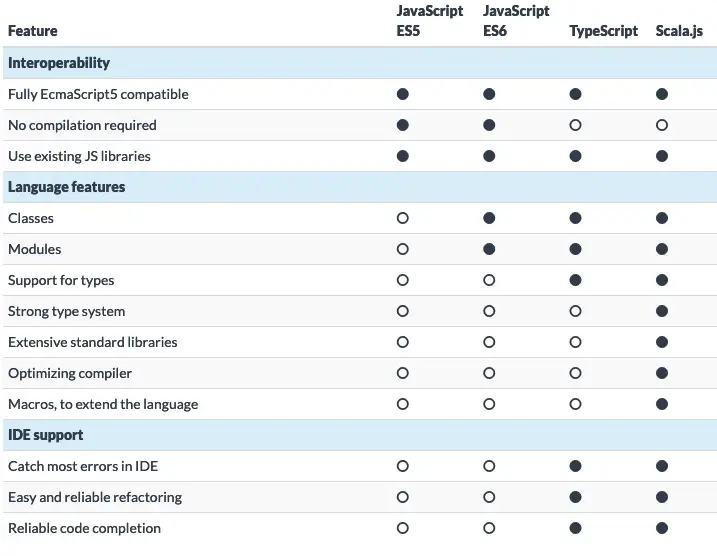
Hopefully you’ve started to see these benefits, and you’ll see more of them in the Scala.js tutorials that will follow this one.
| this post is sponsored by my books: | |||
 #1 New Release |
 FP Best Seller |
 Learn Scala 3 |
 Learn FP Fast |
Next
This tutorial showed the first steps involved in getting started with Scala.js. As I mentioned at the beginning, this first tutorial is heavily based on the basic Scala.js tutorial, so all props to them for their great work.
When you’re ready, my next tutorial in this series is, A Hello, world Scala.js HTML button click example. As that title implies, that tutorial will show how to handle an HTML button click and displays a JavaScript alert dialog.
Reporting from somewhere near Boulder, Colorado, this is Alvin Alexander.
books by alvin
|
|
|
|